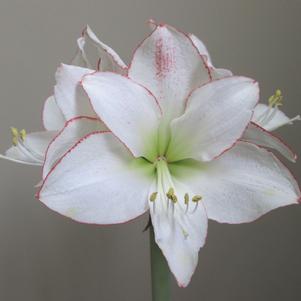
Hippeastrum Holland 'Picotee Petticoat'
Amaryllis - Pre-Order for Fall 2024
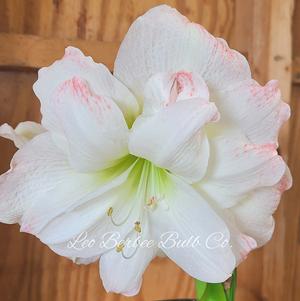
Hippeastrum Holland 'Picotee Petticoat'
Amaryllis - Pre-Order for Fall 2024
Hippeastrum Southern Hemisphere 'Amadeus'
Christmas Forcing Amaryllis - Pre-Order for Fall 2024

Crocus - Pre-Order for Fall 2024

Storage After Arrival
Unpack immediately upon arrival, ventilate if not immediately planted. Store at 58-65°F.
Pre-sprouting (preparation)
Pre-sprounting gives the bulbs a better and more even start for optimal rooting and flower development.
Soak the bags for 12 hours in water at a temperature of 70-80 degree F with 5 gr GA3 (Gibberellic Acid) per 100 liter maintain temp. of 70-80 degree F during this 12 hour period. Make sure that the whole bag is submerged in water for the whole period!
Dip the bulbs in a fungicide for about 15 minutes: 1% of Topsin (active ingredients: thiofanaat-methyand 500 g/l) + ½% Securo (active ingredients: pyraclostrobin 100 g/l + folpet 300 g/l).
Directly after soaking the bulbs for 12 hours and fungicide dip you need to plant bulbs directly in the ground, keep the soil moist. When direct planting is not possible, store the Ranunculus in a coldstore at 41 degrees F.
It is very important to make sure that bulbs do not dry out after planting. (When bulbs dry out you will have loss of germination of the bulbs).
Prior to planting:
Take a soil sample (before you start preparing the soil and bulbs).
Fertilizing depends on a soil and water sample / analysis.
PH: 5.8 – 6.3;
EC: 1.3 to 1.5.
Planting/Spacing
Plant in a moist and well-drained soil free from weeds, with a soil temperature below the 50 degrees F.
Plant approximately ½ to ¾ inch deep, spacing bulbs 6-8 inches apart within the rows and space each row 6-8 inches apart, max of 4 rows per bed.
Recommended to use 1 layer of nets for support.
Plant the bulbs with the center of the bulb facing up and the end of the roots down. Be careful of not damaging the bulbs when planting. Water bulbs after planting so the soil is moist and encloses around the bulbs.
Watering
In the beginning, utilize overhead watering. Later, water only by drip hoses.
Very important especially in the beginning of the crop to keep the soil moist at all times!
Fertilization
Until some years ago, only phosphate was known for a better root development. Now we know that the plants have a preferred order as it comes to the absorption of elements. In the first stage of growth they need sulfur, followed in order by boron, silicon, calcium, nitrogen, magnesium and last but not least phosphorus.
The availability of these elements – especially boron, silicon and calcium – are essential for a good start of the plants. If one of these elements is not (enough) available, the chain will be broken and the growing process might start slower or with more problems.
Apply your fertilizer according to your soil sample.
Approximately 1 week after planting, drench the soil with a ‘cocktail’ so the rooting is easier:
• Risolex;
• Topsin;
• Proplant/previcure.
Growing
First 2-4 weeks you will see your Ranunculus sprouting in the ground, try to keep night temperatures around 15 degrees C at night and during day as cool as possible.
When plants have sprouted and are growing for about 4-5 weeks and you have sufficient foliage on the bulbs growing lower the night temperature to as cool as possible. (no frost) You get best quality Ranunculus when growing is as cool as possible, you can grow as cool as 2-4 degrees C. if possible keep sides open of greenhouse.
During night keep well enough ventilated to prevent mildew.
Grow Ranunculus as cool as possible.
Diseases and insects:
- Botrytis and Mildew: spray with Flint, Ortiva or Switch (the only remedy that works curatively at low temperatures) and use leaf fertilizers + trace elements to make the leaves harder.
- Leaf spot: spray preventive with Luna Privilege and use leaf fertilizers + trace elements to make the leaves harder. Because this disease is very contagious, it is important to spray preventive
- Xanthomonas: gives round, purple-red spots, often with a yellow circle. Spray preventively with, for example, Serenade or Ranman Top. And use leaf fertilizers + trace elements to make the leaves harder.
- Erwina: spray preventive with copper oxychloride.
- Do regular spotting in the greenhouse to check for: Caterpillars, Aphids (Tepeki), Leaf Miners (Vertimec), Spider Mites, Thrips and Whiteflies. And spray when needed.
Flower harvest and treatment during harvest:
Do not pull the stems from the bulb always cut with knife!
Cool water buckets night before in cooler to have cold water in harvesting buckets.
When flowers are cut early in the morning, as soon as possible place them in water at a temperature of 40 degrees F (even before bunching) and store them in a cooler. If the crop is harvested later during the day and the stem dries in and will absorb less water, which is why it is important to place directly in water after cutting.
Cutting stage Ranunculus Romance:
Llet the flowers open and close for 3 days and then cut the flowers for maximum size. (this gives you larger flowers and longer vase life) .Harvest Ranunculus Romance flowers only early in the morning, cutting stem at ground level.
Add a Chlorine tablet of Florissant 520 into a bucket with water to be placed in the cooler.
More Details
Storage After Arrival
Unpacked immediately upon arrival, ventilate if not immediately planted. Ideal storage temperatures are 50-60 degrees Fahrenheit
Planting in Zones 8 and warmer (Fall Planting)
Choose a location with well-draining soil and that does not still puddle 5 or 6 hours after a hard rain. Adding organic matter of at least 2-3in will improve drainage. Plant bulbs 4-6in apart, 2-3in deep. Water after planting to encourage root development. Refrain from watering until leaves sprout (most likely will occur in spring).
Planting in Zones 7 and colder (Spring Planting)
Growing in Containers:
Fill a container with drainage holes with good-quality, well-draining potting mix. Leaving 3-4 inches between bulbs will allow plenty of room for growth. Plant about 2 inches deep. Water after planting. Once the danger of a hard frost has passed, place the container in a location that receives full sun all day.
Growing in Outdoor Landscape Beds:
About a month before last average frost, soak the bulbs 3-4 hours (but not more than 4 hours) in tepid water before planting outside in a well-drained location with full sun.
Growing in Greenhouses:
Follow instructions for container growing. Ideal greenhouse temperatures are 45-48 degrees Fahrenheit at night and 58-65 degrees Fahrenheit during the day. Temperatures above 70 degrees Fahrenheit should be avoided. Following soaking instructions for outdoor landscape beds will give ranunculus a head start on growth.
Watering/Fertilizer/Growing
Begin watering once plants begin to grow being careful not to allow the soil to become soggy. Fertilizing is not necessary. In warmer climates, wait until foliage dies back before completely removing it. In colder climates, ranunculus are annuals and bulbs will need to be replaced each year. On average, ranunculus begin to bloom 90 days after planting. Flowering typically lasts approximately 6 to 7 weeks for fall planted bulbs and 4 to 6 weeks for spring planted bulbs.
More Details
Storage After Arrival
Unpack immediately upon arrival, ventilate if not immediately planted. Store at 58-65°F.
Pre-sprouting (preparation)
Pre-sprounting gives the bulbs a better and more even start for optimal rooting and flower development.
Soak the bags for 12 hours in water at a temperature of 70-80 degree F with 5 gr GA3 (Gibberellic Acid) per 100 liter maintain temp. of 70-80 degree F during this 12 hour period. Make sure that the whole bag is submerged in water for the whole period!
Dip the bulbs in a fungicide for about 15 minutes: 1% of Topsin (active ingredients: thiofanaat-methyand 500 g/l) + ½% Securo (active ingredients: pyraclostrobin 100 g/l + folpet 300 g/l).
Directly after soaking the bulbs for 12 hours and fungicide dip you need to plant bulbs directly in the ground, keep the soil moist. When direct planting is not possible, store the Ranunculus in a coldstore at 41 degrees F.
It is very important to make sure that bulbs do not dry out after planting. (When bulbs dry out you will have loss of germination of the bulbs).
Prior to planting:
Take a soil sample (before you start preparing the soil and bulbs).
Fertilizing depends on a soil and water sample / analysis.
PH: 5.8 – 6.3;
EC: 1.3 to 1.5.
Planting/Spacing
Plant in a moist and well-drained soil free from weeds, with a soil temperature below the 50 degrees F.
Plant approximately ½ to ¾ inch deep, spacing bulbs 6-8 inches apart within the rows and space each row 6-8 inches apart, max of 4 rows per bed.
Recommended to use 1 layer of nets for support.
Plant the bulbs with the center of the bulb facing up and the end of the roots down. Be careful of not damaging the bulbs when planting. Water bulbs after planting so the soil is moist and encloses around the bulbs.
Watering
In the beginning, utilize overhead watering. Later, water only by drip hoses.
Very important especially in the beginning of the crop to keep the soil moist at all times!
Fertilization
Until some years ago, only phosphate was known for a better root development. Now we know that the plants have a preferred order as it comes to the absorption of elements. In the first stage of growth they need sulfur, followed in order by boron, silicon, calcium, nitrogen, magnesium and last but not least phosphorus.
The availability of these elements – especially boron, silicon and calcium – are essential for a good start of the plants. If one of these elements is not (enough) available, the chain will be broken and the growing process might start slower or with more problems.
Apply your fertilizer according to your soil sample.
Approximately 1 week after planting, drench the soil with a ‘cocktail’ so the rooting is easier:
• Risolex;
• Topsin;
• Proplant/previcure.
Growing
First 2-4 weeks you will see your Ranunculus sprouting in the ground, try to keep night temperatures around 15 degrees C at night and during day as cool as possible.
When plants have sprouted and are growing for about 4-5 weeks and you have sufficient foliage on the bulbs growing lower the night temperature to as cool as possible. (no frost) You get best quality Ranunculus when growing is as cool as possible, you can grow as cool as 2-4 degrees C. if possible keep sides open of greenhouse.
During night keep well enough ventilated to prevent mildew.
Grow Ranunculus as cool as possible.
Diseases and insects:
- Botrytis and Mildew: spray with Flint, Ortiva or Switch (the only remedy that works curatively at low temperatures) and use leaf fertilizers + trace elements to make the leaves harder.
- Leaf spot: spray preventive with Luna Privilege and use leaf fertilizers + trace elements to make the leaves harder. Because this disease is very contagious, it is important to spray preventive
- Xanthomonas: gives round, purple-red spots, often with a yellow circle. Spray preventively with, for example, Serenade or Ranman Top. And use leaf fertilizers + trace elements to make the leaves harder.
- Erwina: spray preventive with copper oxychloride.
- Do regular spotting in the greenhouse to check for: Caterpillars, Aphids (Tepeki), Leaf Miners (Vertimec), Spider Mites, Thrips and Whiteflies. And spray when needed.
Flower harvest and treatment during harvest:
Do not pull the stems from the bulb always cut with knife!
Cool water buckets night before in cooler to have cold water in harvesting buckets.
When flowers are cut early in the morning, as soon as possible place them in water at a temperature of 40 degrees F (even before bunching) and store them in a cooler. If the crop is harvested later during the day and the stem dries in and will absorb less water, which is why it is important to place directly in water after cutting.
Cutting stage Ranunculus Romance:
Llet the flowers open and close for 3 days and then cut the flowers for maximum size. (this gives you larger flowers and longer vase life) .Harvest Ranunculus Romance flowers only early in the morning, cutting stem at ground level.
Add a Chlorine tablet of Florissant 520 into a bucket with water to be placed in the cooler.
More Details