Canna
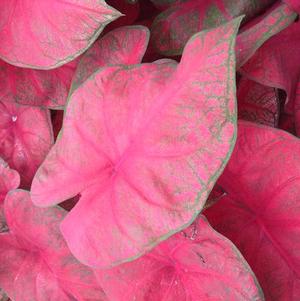
Caladium Fancy Leaf 'Brandywine'
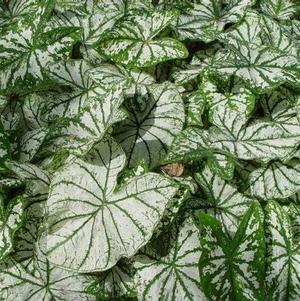
Caladium

Asparagus requires large space, with lots of sun and well drained soil. Male asparagus plants produce higher yields, spears might be smaller but are typically uniform and more numerous. Best time to plant is mid-April into late May.
More Details")
Where to Plant:
Choose a location that receives light to moderate shade. Avoid full sun.
How to Plant:
Astilbe prefer rich, well draining soil. Amend heavy soils with peat moss, perlite, compost, or course sand to improve drainage. Plant astilbe so that the crown is at the same level as the top of the soil. Make sure the holes are twice as wide as the plants and 4 to 6 inches deep. Place the plants so that the roots are fanned slightly and pointing downwards, with the crown planted 1 to 2 inches below the ground level. Cover the roots with soil and press firmly.
Water:
Keep soil consistantly moist, but avoid over watering. Do not allow to dry out between waterings.
More Details
shiny green foliage, clear blue flowers
More Details
Caladiums require a warm, moist soil. A minimum of soil temperature of 78-80 F is preferred. If planted too early in spring, cool soil temperatures will cause tubers to rot before they sprout. They can be started indoors in moist peat moss or potting soil in containers such as a shallow flat or flower pot. Barely cover tubers with soil and place the container in a warm germination room with bright light. Tubers should be started indoors approximately four weeks before planting outdoors.
More Details
Canna can be planted anytime of the year in southern zones but the soil temperature should be 78-80° F. In zones 3-8, plant in spring and summer when ground temperature is not below 65°F. They should be started indoors one month prior to moving outside. Canna prefer a sunny location in moist, fertile soil. When planting outside, prepare soil by spading and adding compost or rotted manure. Rhizomes should be planted 1 - 1/2" deep and spaced 18-24" apart. Soak well after planting. For container planting, pot one rhizome per gallon in well drained potting mix. Containers will finish in 10-12 weeks when potted during the appropriate temperatures: Daytime 70-75° F; Night 65-70° F. Fertilize established (2-3 weeks) plants monthly with 1:2:1 ratio (12:24:12 or 5:10:5), fertilizing at 1/2 the package recommendation. NPK at 200 ppm weekly in injector fed systems.
More Details
Location
Clematis and vines will require an area that will have at least a half day or more direct sunlight. The plant depending on the variety will grow upright six to twelve feet. Although it can only grow as tall as the trellis, arbor or support that you have given it. For example, if your trellis is eight feet tall and the vine you choose grows to twelve feet, it would simply hang over and grow down the other side.
Soil Preparation
Clematis and vines need a moist, well-drained soil. Prepare your hole at least one foot deep and mix 50% peat moss or well-rotted manure. Backfill hole with the amended soil and plant the vines so the top of the root ball is just below the ground level burying the first set of eyes. The plant should be mulched and kept moist, not wet, especially during the first growing season. Fertilize every four weeks during the growing season with a
well-balanced liquid fertilizer.
Support
The main stem of the clematis or vines must have a firm support, otherwise damage may occur through wind. As the newly planted
vine produces new growth this should be carefully trained and tied into position.
More Details
Soil Preparation and Planting
Best grown in fertile, humusy, organically rich, medium to wet soils in part shade or filtered sun. In general, green types can take higher light levels; dark-leaved ones need shade. Once nighttime temperatures are consistently 50-60° F, plant each bulb 6-8" deep and 2-4 feet apart. Water generously.
Fertilization
Fertilize Colocasia every three weeks during fall and winter. Use a liquid plant food with a balanced N-P-K ratio such as 10-10-10 or 20-20-20, diluted to half the strength recommended on the label. Water the fertilizer deeply into the soil immediately after application.
Water
Elephant ears are high water plants. Water as needed to keep the soil consistently moist, and don't allow the soil to become dry. Colocasia likes wet soil and is even appropriate for planting next to a pond, or in water up to 6 inches deep. Check the soil often if the bulbs are planted in sunlight.
Fall Care and Storage
Dig Colocasia bulbs after the first frost in autumn if you live in a climate with cold winters. Cut the foliage down to 2 to 4 inches before cutting. Allow the bulbs to dry for a day, and then place the bulbs in a box of wood shavings or peat moss. Store the box where the temperatures don't drop below 45°F.
More Details
Where To Plant
For best growth, plant convallaria in well drainging soil where they will receive light to moderate shade. Amend soil with compost or
other organic material to improve drainage.
How To Plant
Plant roots so that the tops just barely poke above the soil. Water generously to settle soil around the roots.


Storage After Arrival Until Planting Time
Upon arrival, inspect the roots for any possible damage. Store the roots in the closed shipping container at 45-50° F up to 2-3 weeks.
Forcing Dahlia for Pot
Greenhouse Culture
The greenhouse requirements and general growth pattern of the Dahlia are quite similar to those of the Easter Lily. Dahlias begin to shoot
growth slowly and unevenly and will range from 1-2-3 or more shoots. DO NOT PERMIT MORE THAN 3 SHOOTS TO DEVELOP FROM THE CROWN.
Watering
After planting, water the medium thoroughly. Subsequently, for the initial 4-5 weeks keep the medium moist but not wet. After the shoots begin to
develop water should be applied directly to the medium. Avoid wetting the foliage whenever possible.Once the flowerbuds become visible, watering will
have to be more frequently and thoroughly. This is due to increased water requirements of the plant. On the date that A'Rest is to be applied as a
soil drench, the medium must be moist. Water the evening before and then apply the A'Rest the next morning.
Potting, Planting Medium, Spacing
Normally Dahlia are forced single in a 6" (15 cm) pot, either 3/4 or standard size pots can be used. Also either clay or plastic pots can be used but
plastic pots are preferred. Dahlia require a well drained, granulated medium. It should be sterile, have a pH of 6-7 and be low in soluble salts.
Because the application of A'Rest must be as a soil drench, the texture of the medium is critical. It should consist of equal parts of loamy soil,
a coarse aggregate, and peat. The organic matter should not be over 1/3 of mixture and the medium should not contain bark.
Light, Temperature & Ventilation in Greenhouse
Dahlia must be exposed to full sunlight throughout the greenhouse growing period. Dahlia should be forced at a minimum night temperature of 62-65° F.
Lower temperature will delay flowering. Day temperatures should be kept at 68-72° F. Higher temperatures if given for a prolonged period of time can
reduce the plant quality. To delay the development of the crop near the date of marketing, it is possible to lower the night temperature to 55° F,
conversely, the crop can be accelerated by forcing 70-75° F for a few days. Good ventilation is essential. Do not permit humidity to build up.
Fertilizer
Dahlia require continuous fertilization beginning immediately after shoot growth becomes visible. A complete (NPK) fertilizer is required. A slow release
(14-14-14) fertilizer applied as a top-dress can be used. Also a weekly application of 200 ppmN of a 20-20-20 soluble fertilizer
The liquid feed can be used as a supplement to the slow release fertilization if needed. can be used.
Use of Ancymidol (A'Rest)
The only plant growth regulator approved for use in controlling the tuberous-rooted dahlia is ancymidol (A'Rest). For primary height control the
ancymidol must be applied as a soil drench no later than two weeks after planting. More precisely, it should be applied when the shoots are
approximately 1/4" (0.5 cm) long. At the time of application the planting medium must be moist! See variety list for use of A'Rest.
Pinching
Each variety will produce a range of single, double or multiple shooted roots to develop the maximum flowers per pot at the time of marketing,
and to provide better shaped plants, it is necessary that all plants which are producing only a single strong shoots must be pinched. It appears that
the best stage of development to pinch out the terminal shoot is after the 3rd or 4th pair of leaves have unfolded. Dahlia normally form 2-4
pair of leaves. A pinch at this time will force 2-4 lateral breaks to produce more flowers.
Cultivated Stock
All roots must be from cultivated stock, especially grown for pot culture. Do not use regular, uncultivated stock.
For Cut
Planting, Medium, Watering & Fertilizer
Use a well drained soil pH 6-7 and a low soluble salt. Plant in full sun. Plant the crown slightly above the soil. Do not split roots prior to planting. Place
dahlias in rows 2 feet on center, while the rows should be 2-3 feet apart. Dahlias are a water loving plant. In dry conditions be sure to add water to
allow for proper growth. Continuous feeding is required, beginning at shoot emergence. Use a weekly application of 200 ppmN of a 20-20-20 or a topdress
application of a slow release 14-14-14 fertilizer. Cut when petals begin to loosen. Dahlias can be cut with or without foliage. Keep in cooler at 40-45° F.

Where To Plant
Bleeding heart will grow best in partial to full shade. Ideally, bleeding heart should have morning sun and afternoon shade for best flowering.
How To Plant
Bleeding heart prefer a well draining, slightly acidic soil (pH 6.0 to 6.5), but will tolerate a pH up to 7.5. Apply compost or a general purpose, granular fertilizer in spring. Plant bareroot bleeding heart with the crown 1-2" below the soil line. If grown in poorly drained, wet soil, the crowns of the plants may rot. Avoid these soils and allow good air circulation.
More Details
Where To Plant
Bleeding heart will grow best in partial to full shade. Ideally, bleeding heart should have morning sun and afternoon shade for best flowering.
How To Plant
Bleeding heart prefer a well draining, slightly acidic soil (pH 6.0 to 6.5), but will tolerate a pH up to 7.5. Apply compost or a general purpose, granular fertilizer in spring. Plant bareroot bleeding heart with the crown 1-2" below the soil line. If grown in poorly drained, wet soil, the crowns of the plants may rot. Avoid these soils and allow good air circulation.
More Details


How To Plant
Geraniums prefer full sun and a well-drained, moderately rich soil. They can handle partial shade, but become more prone to mildew if kept damp. Geraniums are not particular about soil pH, but a neutral to slightly acid soil is ideal. (5.8 - 7.0)
Mid Season Care
Shearing plants back to basal growth after blooming will improve their look and encourage reblooming. The plants fill back in within weeks.
More Details