Bleeding Heart

Storage After Arrival Until Planting Time
Upon arrival, inspect the roots for any possible damage. Store the roots in the closed shipping container at 45-50° F up to 2-3 weeks.
Forcing Dahlia for Pot
Greenhouse Culture
The greenhouse requirements and general growth pattern of the Dahlia are quite similar to those of the Easter Lily. Dahlias begin to shoot
growth slowly and unevenly and will range from 1-2-3 or more shoots. DO NOT PERMIT MORE THAN 3 SHOOTS TO DEVELOP FROM THE CROWN.
Watering
After planting, water the medium thoroughly. Subsequently, for the initial 4-5 weeks keep the medium moist but not wet. After the shoots begin to
develop water should be applied directly to the medium. Avoid wetting the foliage whenever possible.Once the flowerbuds become visible, watering will
have to be more frequently and thoroughly. This is due to increased water requirements of the plant. On the date that A'Rest is to be applied as a
soil drench, the medium must be moist. Water the evening before and then apply the A'Rest the next morning.
Potting, Planting Medium, Spacing
Normally Dahlia are forced single in a 6" (15 cm) pot, either 3/4 or standard size pots can be used. Also either clay or plastic pots can be used but
plastic pots are preferred. Dahlia require a well drained, granulated medium. It should be sterile, have a pH of 6-7 and be low in soluble salts.
Because the application of A'Rest must be as a soil drench, the texture of the medium is critical. It should consist of equal parts of loamy soil,
a coarse aggregate, and peat. The organic matter should not be over 1/3 of mixture and the medium should not contain bark.
Light, Temperature & Ventilation in Greenhouse
Dahlia must be exposed to full sunlight throughout the greenhouse growing period. Dahlia should be forced at a minimum night temperature of 62-65° F.
Lower temperature will delay flowering. Day temperatures should be kept at 68-72° F. Higher temperatures if given for a prolonged period of time can
reduce the plant quality. To delay the development of the crop near the date of marketing, it is possible to lower the night temperature to 55° F,
conversely, the crop can be accelerated by forcing 70-75° F for a few days. Good ventilation is essential. Do not permit humidity to build up.
Fertilizer
Dahlia require continuous fertilization beginning immediately after shoot growth becomes visible. A complete (NPK) fertilizer is required. A slow release
(14-14-14) fertilizer applied as a top-dress can be used. Also a weekly application of 200 ppmN of a 20-20-20 soluble fertilizer
The liquid feed can be used as a supplement to the slow release fertilization if needed. can be used.
Use of Ancymidol (A'Rest)
The only plant growth regulator approved for use in controlling the tuberous-rooted dahlia is ancymidol (A'Rest). For primary height control the
ancymidol must be applied as a soil drench no later than two weeks after planting. More precisely, it should be applied when the shoots are
approximately 1/4" (0.5 cm) long. At the time of application the planting medium must be moist! See variety list for use of A'Rest.
Pinching
Each variety will produce a range of single, double or multiple shooted roots to develop the maximum flowers per pot at the time of marketing,
and to provide better shaped plants, it is necessary that all plants which are producing only a single strong shoots must be pinched. It appears that
the best stage of development to pinch out the terminal shoot is after the 3rd or 4th pair of leaves have unfolded. Dahlia normally form 2-4
pair of leaves. A pinch at this time will force 2-4 lateral breaks to produce more flowers.
Cultivated Stock
All roots must be from cultivated stock, especially grown for pot culture. Do not use regular, uncultivated stock.
For Cut
Planting, Medium, Watering & Fertilizer
Use a well drained soil pH 6-7 and a low soluble salt. Plant in full sun. Plant the crown slightly above the soil. Do not split roots prior to planting. Place
dahlias in rows 2 feet on center, while the rows should be 2-3 feet apart. Dahlias are a water loving plant. In dry conditions be sure to add water to
allow for proper growth. Continuous feeding is required, beginning at shoot emergence. Use a weekly application of 200 ppmN of a 20-20-20 or a topdress
application of a slow release 14-14-14 fertilizer. Cut when petals begin to loosen. Dahlias can be cut with or without foliage. Keep in cooler at 40-45° F.

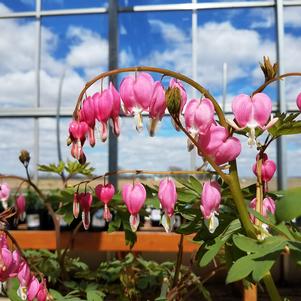
Where To Plant
Bleeding heart will grow best in partial to full shade. Ideally, bleeding heart should have morning sun and afternoon shade for best flowering.
How To Plant
Bleeding heart prefer a well draining, slightly acidic soil (pH 6.0 to 6.5), but will tolerate a pH up to 7.5. Apply compost or a general purpose, granular fertilizer in spring. Plant bareroot bleeding heart with the crown 1-2" below the soil line. If grown in poorly drained, wet soil, the crowns of the plants may rot. Avoid these soils and allow good air circulation.
More Details
Where To Plant
Bleeding heart will grow best in partial to full shade. Ideally, bleeding heart should have morning sun and afternoon shade for best flowering.
How To Plant
Bleeding heart prefer a well draining, slightly acidic soil (pH 6.0 to 6.5), but will tolerate a pH up to 7.5. Apply compost or a general purpose, granular fertilizer in spring. Plant bareroot bleeding heart with the crown 1-2" below the soil line. If grown in poorly drained, wet soil, the crowns of the plants may rot. Avoid these soils and allow good air circulation.
More DetailsWhere To Plant
Bleeding heart will grow best in partial to full shade. Ideally, bleeding heart should have morning sun and afternoon shade for best flowering.
How To Plant
Bleeding heart prefer a well draining, slightly acidic soil (pH 6.0 to 6.5), but will tolerate a pH up to 7.5. Apply compost or a general purpose, granular fertilizer in spring. Plant bareroot bleeding heart with the crown 1-2" below the soil line. If grown in poorly drained, wet soil, the crowns of the plants may rot. Avoid these soils and allow good air circulation.
More Details
Where To Plant
Bleeding heart will grow best in partial to full shade. Ideally, bleeding heart should have morning sun and afternoon shade for best flowering.
How To Plant
Bleeding heart prefer a well draining, slightly acidic soil (pH 6.0 to 6.5), but will tolerate a pH up to 7.5. Apply compost or a general purpose, granular fertilizer in spring. Plant bareroot bleeding heart with the crown 1-2" below the soil line. If grown in poorly drained, wet soil, the crowns of the plants may rot. Avoid these soils and allow good air circulation.
More Details
How To Plant
Soaking plants overnight or at least several hours prior to planting will do wonders for their growth. In the first year, keep them watered as needed. Do not plant too deep. The buds of the fern need to be just below the surface.
Where To Plant
Filtered shade is often the best, but many varieties can handle full sun.
Fertilizer
Do not use fertilizer on native plants. Fertilized ferns and wildflowers will look burnt and dried out but in fact it is a result of fertilization.
More Details

easy to grow for home garden producers, good storage
More Details
How To Plant
Geraniums prefer full sun and a well-drained, moderately rich soil. They can handle partial shade, but become more prone to mildew if kept damp. Geraniums are not particular about soil pH, but a neutral to slightly acid soil is ideal. (5.8 - 7.0)
Mid Season Care
Shearing plants back to basal growth after blooming will improve their look and encourage reblooming. The plants fill back in within weeks.
More Details
How To Plant
Dig hole 1/3 larger than root system or bulb and make the hole 2-3 " deep. Add a thin layer of base soil back in the bottom of the hole.
Root systems (rhizomes) like Trillium and Virginia Blue Bells should be placed on their side, but bulbs and corms should be placed
upright in the hole so that the pointed end is upwards. Fill with soil and water thoroughly.
Watering
Water every three to four days for the first week if it does not rain.

Soil and Preparation:
Gladioli are one of the easiest flowers to grow. They do well in a wide range of soil types – provided drainage is good, but they grow best in soil with a pH of 6.5 to 7. Most garden soil that will produce a good crop of vegetables or weeds will also grow good glads with little or no added fertilizer. Glads prefer full sunlight, but will do reasonably well with a little high shade in early morning or late afternoon. Good circulation is desirable, so stay away from buildings or other obstructions, which might impede airflow. Plow, rototill, or spade your soil as you would for any other garden plants. It is best to move your glad plantings from one area to another each year to help prevent carryover of diseases in the soil. If soil tests or other reliable indicators point to a lack of nutrients, a balanced commercial fertilizer such as 5-10-10 may be incorporated into the soil immediately prior to planting, at a rate of 2- 3 pounds per 100 square feet. Avoid over-fertilizing. Composted animal manure or leaves should only be worked into the soil in the fall.
Planting:
Your first planting should be when you would normally plant sweet corn in your area. Corms (commonly called bulbs) planted in cold soils are apt to rot before they begin to grow. Subsequent plantings at two-week intervals will ensure bloom over a long period of time. We recommend planting corms three to five inches deep and from four to six inches apart, in rows spaced 12-36 inches apart. Insecticide spread in the trench before covering will discourage underground insects. Before glads bloom, hilling soil six inches up around the stalk helps prevent the glads from tipping over during storms. If drainage is a problem in your soil, rows should be raised to facilitate the process. Soggy, compacted soil will hamper root growth and contribute to root rot.
Watering:
Remember that glads need plenty of water, but will not tolerate wet feet. Lack of water inhibits spike growth, flower development and bulb growth. At least an inch of water per week is a good guideline.
Fertilization During Growing:
Before starting any fertilization program, always test the soil for nutrient content. The application of fertilizer should coincide with crop needs. We recommend starting fertilization when the third or fourth leaf is visible. Amounts will vary according to the soil test, but for poor, light soil you may use a fertilizer of 5-10-10 again, or just nitrogen if the nutrient content of your soil is balanced. You would apply this as a side dressing.
Weed and Insect Control:
Weed by shallow cultivation and hand weeding. If available, a light mulch of straw, grass clippings, etc. between rows will discourage weeds and help conserve moisture. Insect control is important in growing glads. Pests include thrip, which is by far the most damaging. Thrip are tiny insects, tan to black in color and less than 1/8” in length. They can be controlled by several good combination sprays and dusts, including organic products, and are available at your local garden centers. If you chose organic products, more frequent applications will be needed.
Digging Corms (Bulbs):
If you live where the ground does not freeze in the winter, you may choose not to dig your corms; however, disease and crowding may reduce the amount and quality of your bloom. You should remove plant tops 6-8 weeks after bloom and remove them from the garden to prevent the spread of disease. It is suggested that you dig and divide your corms every couple of years, being sure to discard any damaged or diseased corms. If you live where the ground freezes, you will need to dig your corms each year, or if you choose not to dig, purchase new corms in the spring. Corms should be lifted in the fall before the onset of freezing weather. About 6-8 weeks after blooming, the corms may be harvested by loosening the soil with a spade or digging fork so that the plants can be pulled up by hand. The plant should be separated from the corm as close to the corm as possible, either by hand breaking or by cutting with pruning shears. You should remove the old plant tops from the field to prevent carryover of disease. The corms should be cleaned or rinsed off with running water, and then spread out to dry in shallow layers in trays or porous bags in an airy location that will not freeze for a period of 2 to 3 weeks. During this time a cork layer forms between the new corm and the old mother corm and roots. Break off and discard this old corm as soon as possible. Undue delay in cleaning results in greater difficulty in removal of the old corm.
Corm Storage:
After cleaning, corms should be lightly dusted with a combination fungicide/insecticide dust, placed in shallow trays, mesh bags or open paper bags to be stored for the winter. Do not use any covering material. A well-ventilated root cellar is ideal, but any room with good air circulation in the average home basement will suffice if temperatures can be kept between 35-50 degrees. The lower temperature is best, as long as they do not freeze.
More Details