
Lilies Double Asiatic 'Red Twin'
Outdoor Lilies
Lilies Double Asiatic 'Red Twin'
Outdoor Lilies

Caladium Fancy Leaf 'Brandywine'
Caladium
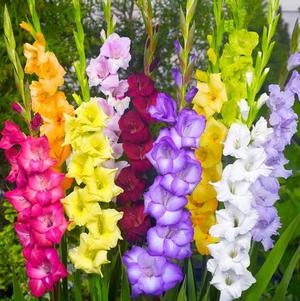
Large Flowering Glad
We carry 422 plants that match your search request. We've included all matches below. Click on any plant to learn additional details.

Storage upon arrival:
Use a low humidity, well-ventilated area. Short-term storage temperature should be 55-60⁰F. Long-term storage or if the sprouts begin to show, lower the temperature to 41⁰ F
Planting:
Use sterilized, well-draining planting medium with a pH 6.00 to 6.80. Never use fresh manure or tree bark as part of the medium. Ideally the soil mix should consist of 1/3 peat, 1/3 sand, 1/3 compost or 1/2 peat and 1/2 sand or 60% coarse peat + 40% perlite. Branded potting soils such as Sunshine #4 may also be used. Use clean pots which will accommodate the bulb(s) comfortably without much room to spare. Pots must have drainage holes. Do not damage or remove existing roots. Hold the bulb so that the roots hang down into the pot. Firm in the medium around the bulb so that no air pockets remain amongst the roots. The bulb nose should be above the rim of the pot, and the shoulders of the bulb just above the surface of the soil. Pots may be placed next to each other. Do not use saucers. Ensure that the area is well ventilated and that the relative humidity stay as low as possible.
Watering
After planting, water thoroughly. Subsequently, the medium should be kept only slightly moist. It is important not to overwater the plant in order to stimulate regrowth of the basal root system. USE TEPID WATER!! Do not water the bulb nose.
Temperature
Maintain a CONSTANT temperature day and night of 79° F to 82° F for optimal results - bottom heating is preferred. During the forcing period the temperature should never fall below 72° F or rise above 86° F. To delay the flowering, place pots at 48° F at stage 2 (before opening of the first bud). At this temperature growth will virtually come to a halt and the plants may be kept at this temperature for up to 10 days. To make the plants resume growth, move the pots to a warmer area. No water should be administered while the plants are 9° C (48° F). To ACCELERATE growth, increase the temperature in the greenhouse, always ensuring an even, constant temperature day and night. Do not exceed 86° F.
Light
Hippeastrums may be forced in full light as well as in darkness (until stage 2) as long as the above guidelines as to temperature, ventilation and humidity are followed. If the bulbs have been forced in the dark until stage 2, the plants will need source is oblique from one side. Low light conditions and lower temperatures during forcing will result in taller stems at flowering. High light conditions and higher temperatures during forcing will promote shorter stems at flowering
More Details
Planting:
In average, medium moisture, well-drained, preferably sandy soil, plant bulbs about 3-4” deep and 4-6” apart in the fall.
Light:
Full sun to part shade, but best in sun-dappled part shade. Can tolerate shade.
Naturalization:
Naturalizes well by both bulb offsets and self-seeding in optimum growing conditions and can hybridize with plants of Hyancinthoides non-scripta (English bluebells) if planted near each other, resulting in different forms appearing through self-seeding.
More Details
Planting
Plant in fall, 3 inches deep and 3 inches apart. Plants will naturalize over time.
Forcing
Can also be forced in pots for indoor enjoyment. Place in pot filled loosely with potting mix, setting bulbs side by side but not touching. Leaving the top 1/3 of the bulbs exposed, cover loosely wtih soil. Water and store in a cool, dark location for 10 to 12 weeks. Keep soil most but not wet. When shoots emerge, gradually move toward an indoor, sunny location, turning every couple days for even growth.
Soil
Prefers well-drained medium moisture soil. Keep moist in spring, but reduce water when foliage begins to die back.
Sun
Prefers full sun to part shade. Plant is more vigorous in full sun, but blooms last longer in part shade.
More Details
FOR POT OR CUT FORCING
Storage after arrival
Since the bulbs are treated they can only be stored for a few days at 63°F under well ventilated conditions.
Planting/Forcing
Grow plants pot to pot on the bench. Use a well drained, pH 6-7 sterilized soil. Plant: 3 bulbs in a 5" pot; 4-5 bulbs in a 6" pot; 7-9 bulbs in an 8" pot. Forcing time is generally 3-6 weeks depending on time of planting.
Watering, Fertilizer, Light Requirements
Keep planting medium moist but do not over water. Fertilization is neither harmful nor is it required for paperwhites in a greenhouse. Use a medium light (5000 ft. candle) intensity greenhouse that is well ventilated.
Temperature
Use 60-63°F night temperatures. Lower temperatures can be used but the plant will take longer to reach market stage.
Height Control for Pots
In order to reduce excessive elongation of the flower stalk and leaves of "Ziva" the plants can be sprayed to run off with 2000 ethephon (Florel) when the shoots are 4-5" long. A 2000 ppm Florel solution is one pint in 2.5 gallons and this treats about 500 6" pots. It is important that the foliage be dry at the time of treatment. Also, do not wet the foliage for 12 hours after treatment - late afternoon is the best time to spray. Treatment can delay flowering by 2-4 days.
Marketing, Harvesting and Storage
Forcers - the plants should be marketed with the shoots 8-10" tall and the flowers are visible. Do not wait until they begin to show color.
More Details
Planting
Plant onion sets directly into the ground, 1 to 2 inches deep, 2 to 3 inches apart. Once growing starts, thin to a 3 to 4 inch spacing. Thinned onions are tender and green - great to use as green onions.
Soil
Prefers, loose, well-drained, fertile soil, with a pH between 6.0 and 6.8.
Light
Requires full sun.
Care
Onions will benefit from 3 fertilizer applications in the growing season - one 40 to 60 days after planting, one mid-season, and one 4 weeks before harvest.
Harvest/Storage
Harvest when tops are wilted. Cure after harvest by laying out to dry in a shaded location for 2 to 4 weeks, until the outer skin is papery thin. Store in a cool (32 to 40 degrees), dry area in well-ventilated containers.
More Details
Soil and Preparation
Peonies prefer well-draining, humus-rich moist soil. Amend heavy or very sandy soil with compost. Additionally, 1 cup of bonemeal can be used to amend the soil prior to planting. Choose a location in full sun, but one that provides ample growing room along with protection from strong winds.
Planting
Dig a a hole large enough to accommodate the roots and set the root so the eyes face upward. Fill in the hole, making sure to keep the peony's eyes/buds not deeper than 2" below the soil line. Water thoroughly to settle the soil around the roots.
Fertilization During Growing
They do not require fertilization other than a yearly addition of compost unless a soil test shows a deficiency in nutrients.
Cutting Guidelines
Years 1 & 2: Do not cut any blooms. Dis-budding is recommended to encourage root growth and overall plant development.
Year 3: For 2/3 eye roots - Cut 1/3 of the total blooms; For 3/5 eye roots - Cut 50% of the blooms
Year 4: Cut 70% of the total blooms
More Details
Storage After Arrival
Unpack immediately upon arrival, ventilate if not immediately planted. Store at 58-65°F.
Pre-sprouting (preparation)
Pre-sprounting gives the bulbs a better and more even start for optimal rooting and flower development.
Soak the bags for 12 hours in water at a temperature of 70-80 degree F with 5 gr GA3 (Gibberellic Acid) per 100 liter maintain temp. of 70-80 degree F during this 12 hour period. Make sure that the whole bag is submerged in water for the whole period!
Dip the bulbs in a fungicide for about 15 minutes: 1% of Topsin (active ingredients: thiofanaat-methyand 500 g/l) + ½% Securo (active ingredients: pyraclostrobin 100 g/l + folpet 300 g/l).
Directly after soaking the bulbs for 12 hours and fungicide dip you need to plant bulbs directly in the ground, keep the soil moist. When direct planting is not possible, store the Ranunculus in a coldstore at 41 degrees F.
It is very important to make sure that bulbs do not dry out after planting. (When bulbs dry out you will have loss of germination of the bulbs).
Prior to planting:
Take a soil sample (before you start preparing the soil and bulbs).
Fertilizing depends on a soil and water sample / analysis.
PH: 5.8 – 6.3;
EC: 1.3 to 1.5.
Planting/Spacing
Plant in a moist and well-drained soil free from weeds, with a soil temperature below the 50 degrees F.
Plant approximately ½ to ¾ inch deep, spacing bulbs 6-8 inches apart within the rows and space each row 6-8 inches apart, max of 4 rows per bed.
Recommended to use 1 layer of nets for support.
Plant the bulbs with the center of the bulb facing up and the end of the roots down. Be careful of not damaging the bulbs when planting. Water bulbs after planting so the soil is moist and encloses around the bulbs.
Watering
In the beginning, utilize overhead watering. Later, water only by drip hoses.
Very important especially in the beginning of the crop to keep the soil moist at all times!
Fertilization
Until some years ago, only phosphate was known for a better root development. Now we know that the plants have a preferred order as it comes to the absorption of elements. In the first stage of growth they need sulfur, followed in order by boron, silicon, calcium, nitrogen, magnesium and last but not least phosphorus.
The availability of these elements – especially boron, silicon and calcium – are essential for a good start of the plants. If one of these elements is not (enough) available, the chain will be broken and the growing process might start slower or with more problems.
Apply your fertilizer according to your soil sample.
Approximately 1 week after planting, drench the soil with a ‘cocktail’ so the rooting is easier:
• Risolex;
• Topsin;
• Proplant/previcure.
Growing
First 2-4 weeks you will see your Ranunculus sprouting in the ground, try to keep night temperatures around 15 degrees C at night and during day as cool as possible.
When plants have sprouted and are growing for about 4-5 weeks and you have sufficient foliage on the bulbs growing lower the night temperature to as cool as possible. (no frost) You get best quality Ranunculus when growing is as cool as possible, you can grow as cool as 2-4 degrees C. if possible keep sides open of greenhouse.
During night keep well enough ventilated to prevent mildew.
Grow Ranunculus as cool as possible.
Diseases and insects:
- Botrytis and Mildew: spray with Flint, Ortiva or Switch (the only remedy that works curatively at low temperatures) and use leaf fertilizers + trace elements to make the leaves harder.
- Leaf spot: spray preventive with Luna Privilege and use leaf fertilizers + trace elements to make the leaves harder. Because this disease is very contagious, it is important to spray preventive
- Xanthomonas: gives round, purple-red spots, often with a yellow circle. Spray preventively with, for example, Serenade or Ranman Top. And use leaf fertilizers + trace elements to make the leaves harder.
- Erwina: spray preventive with copper oxychloride.
- Do regular spotting in the greenhouse to check for: Caterpillars, Aphids (Tepeki), Leaf Miners (Vertimec), Spider Mites, Thrips and Whiteflies. And spray when needed.
Flower harvest and treatment during harvest:
Do not pull the stems from the bulb always cut with knife!
Cool water buckets night before in cooler to have cold water in harvesting buckets.
When flowers are cut early in the morning, as soon as possible place them in water at a temperature of 40 degrees F (even before bunching) and store them in a cooler. If the crop is harvested later during the day and the stem dries in and will absorb less water, which is why it is important to place directly in water after cutting.
Cutting stage Ranunculus Romance:
Llet the flowers open and close for 3 days and then cut the flowers for maximum size. (this gives you larger flowers and longer vase life) .Harvest Ranunculus Romance flowers only early in the morning, cutting stem at ground level.
Add a Chlorine tablet of Florissant 520 into a bucket with water to be placed in the cooler.
More Details