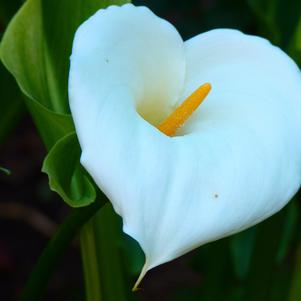
Zantedeschia Aethiopica 'Aethiopica'
Calla Aethiopica - Pre-Order for Fall 2024
Zantedeschia Aethiopica 'Aethiopica'
Calla Aethiopica - Pre-Order for Fall 2024
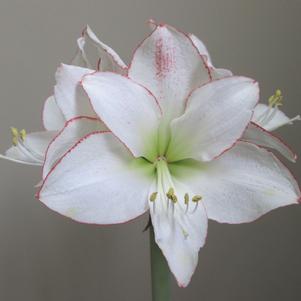
Hippeastrum Holland 'Picotee Petticoat'
Amaryllis - Pre-Order for Fall 2024
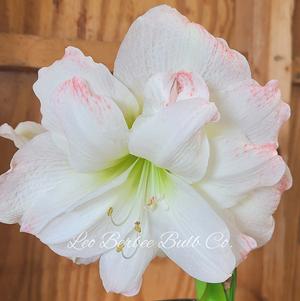
Hippeastrum Southern Hemisphere 'Amadeus'
Christmas Forcing Amaryllis - Pre-Order for Fall 2024
We carry 133 plants that match your search request. We've included all matches below. Click on any plant to learn additional details.
")
Where to Plant:
Choose a location that receives light to moderate shade. Avoid full sun.
How to Plant:
Astilbe prefer rich, well draining soil. Amend heavy soils with peat moss, perlite, compost, or course sand to improve drainage. Plant astilbe so that the crown is at the same level as the top of the soil. Make sure the holes are twice as wide as the plants and 4 to 6 inches deep. Place the plants so that the roots are fanned slightly and pointing downwards, with the crown planted 1 to 2 inches below the ground level. Cover the roots with soil and press firmly.
Water:
Keep soil consistantly moist, but avoid over watering. Do not allow to dry out between waterings.
More Details")
Where to Plant:
Choose a location that receives light to moderate shade. Avoid full sun.
How to Plant:
Astilbe prefer rich, well draining soil. Amend heavy soils with peat moss, perlite, compost, or course sand to improve drainage. Plant astilbe so that the crown is at the same level as the top of the soil. Make sure the holes are twice as wide as the plants and 4 to 6 inches deep. Place the plants so that the roots are fanned slightly and pointing downwards, with the crown planted 1 to 2 inches below the ground level. Cover the roots with soil and press firmly.
Water:
Keep soil consistantly moist, but avoid over watering. Do not allow to dry out between waterings.
More Details
Caladiums require a warm, moist soil. A minimum of soil temperature of 78-80 F is preferred. If planted too early in spring, cool soil temperatures will cause tubers to rot before they sprout. They can be started indoors in moist peat moss or potting soil in containers such as a shallow flat or flower pot. Barely cover tubers with soil and place the container in a warm germination room with bright light. Tubers should be started indoors approximately four weeks before planting outdoors.
More Details
Where To Plant
For best growth, plant convallaria in well drainging soil where they will receive light to moderate shade. Amend soil with compost or
other organic material to improve drainage.
How To Plant
Plant roots so that the tops just barely poke above the soil. Water generously to settle soil around the roots.

Where To Plant
Bleeding heart will grow best in partial to full shade. Ideally, bleeding heart should have morning sun and afternoon shade for best flowering.
How To Plant
Bleeding heart prefer a well draining, slightly acidic soil (pH 6.0 to 6.5), but will tolerate a pH up to 7.5. Apply compost or a general purpose, granular fertilizer in spring. Plant bareroot bleeding heart with the crown 1-2" below the soil line. If grown in poorly drained, wet soil, the crowns of the plants may rot. Avoid these soils and allow good air circulation.
More Details


How To Plant
Geraniums prefer full sun and a well-drained, moderately rich soil. They can handle partial shade, but become more prone to mildew if kept damp. Geraniums are not particular about soil pH, but a neutral to slightly acid soil is ideal. (5.8 - 7.0)
Mid Season Care
Shearing plants back to basal growth after blooming will improve their look and encourage reblooming. The plants fill back in within weeks.
More Details
Soil and Preparation:
Plant hostas in well-drained, slightly acidic, soil (pH of 5.8 to 6.5). A high, “basic” pH of over 7.2 can change the leaf color.
Avoid planting hostas in a poorly drained location. Root and crown rot are prevalent in hostas planted in such sites.
Planting:
Dig a hole large enough to accommodate the root mass, usually about 6-8" deep. Once the hole is prepared, place the daylily upright, it into the space.
Holding it so the crown (top of the roots) is level with the surrounding surface, spread the roots out in the hole and loosely push soil over the roots.
Fertilization During Growing:
They do not require fertilization other than a yearly addition of compost unless a soil test shows a deficiency in nutrients.

Planting
Can plant in either early spring or early fall in an area that provides consistently moist soil. Add peat moss to the soil when planting. Water more frequently when first planted.
Soil
Grows well in damp soil, in marshy areas, and along water features.
Light
Prefers shade to part shade.
Care
If soil is nutrient-rich, no fertilizer is needed, but would benefit from a layer of compost each year.
More Details


How To Plant
Geraniums prefer full sun and a well-drained, moderately rich soil. They can handle partial shade, but become more prone to mildew if kept damp. Geraniums are not particular about soil pH, but a neutral to slightly acid soil is ideal. (5.8 - 7.0)
Mid Season Care
Shearing plants back to basal growth after blooming will improve their look and encourage reblooming. The plants fill back in within weeks.
More Details
How To Plant
Dig hole 1/3 larger than root system or bulb and make the hole 2-3 " deep. Add a thin layer of base soil back in the bottom of the hole.
Root systems (rhizomes) like Trillium and Virginia Blue Bells should be placed on their side, but bulbs and corms should be placed
upright in the hole so that the pointed end is upwards. Fill with soil and water thoroughly.
Watering
Water every three to four days for the first week if it does not rain.