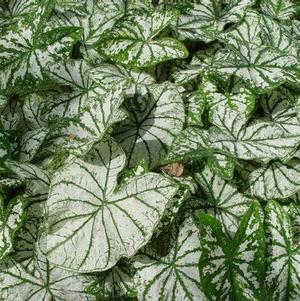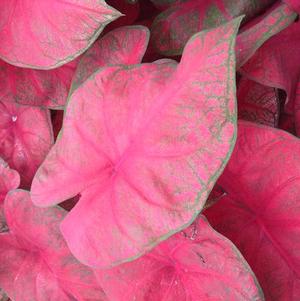
Caladium Fancy Leaf 'Brandywine'
Caladium
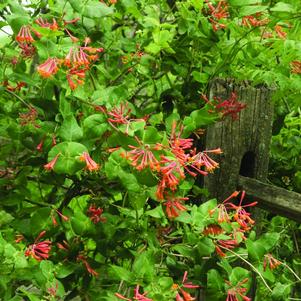
Lonicera Semperviron L. Hirsuta 'Dropmore Scarlet'
Honeysuckle Vine
We carry 113 plants that match your search request. We've included all matches below. Click on any plant to learn additional details.

Soil and Preparation:
Plant hostas in well-drained, slightly acidic, soil (pH of 5.8 to 6.5). A high, “basic” pH of over 7.2 can change the leaf color.
Avoid planting hostas in a poorly drained location. Root and crown rot are prevalent in hostas planted in such sites.
Planting:
Dig a hole large enough to accommodate the root mass, usually about 6-8" deep. Once the hole is prepared, place the daylily upright, it into the space.
Holding it so the crown (top of the roots) is level with the surrounding surface, spread the roots out in the hole and loosely push soil over the roots.
Fertilization During Growing:
They do not require fertilization other than a yearly addition of compost unless a soil test shows a deficiency in nutrients.

Planting
Liriope does well in a variety of areas - edging walkways, under trees, in rock gardens, woodland settings, or as a ground cover. Water regularly in first year.
Soil
Prefers well-drained to dry soil and can tolerate drought once established. Water regularly the first year.
Sun
Tolerates full sun to full shade but flowers best in part shade.
More Details
Storage After Arrival
Before planting, rhizomes can be stored up to 4 weeks at 40-50⁰F. Be sure to keep them covered so they do not dry out.
Planting
Use a well drained, sterilized planting medium. Ideal pH should be 6.5 and no lower. Plant 3 rhizomes per 4" pot; 4 rhizomes per 5" pot.
Lay the corms (roots) flat and cover with 1/2" of soil medium. Fafard #2 and Metro Mix 350 are the best suited soils.
Avoid any soil which contains bark. Can be placed pot to pot when grown on benches until leaves start, then space 8" on center.
Watering
Water the medium thoroughly, then only water the medium when it becomes dry and/or the plants begin to grow vigorously. DO NOT OVERWATER.
Fertilizer
Because oxalis grow fast, they need to have sufficient fertilizer. Use a complete NPK fertilizer on a weekly basis once the plants begin to
grow vigorously. Either 200 ppm of 20-20-20 or 14-14-14 Osmocote can be used. If any chlorosis begins to appear in the oldest leaves,
use a micronutrient foliage spray. If the foliage is yellowing this could be a nitrogen deficiency problem.
Light Requirements
Use a medium light (2500-5000 ft. candle) intensity greenhouse that is well ventilated.
Temperature
In order to assure proper germination, start Regnelli White at 68-75⁰F - Triangularis & Fanny at 72-78⁰F. The plants grow well in full sun or light shade at temperatures between 70-75⁰F. If grown at lower than 65⁰F or higher than 85⁰F the plants may suffer. If flowers bloom down in the foliage, the plant has probably been grown with too much shade. Once the plants show vigorous growth the temperature may be lowered to 65⁰F.
Height Control for Pots
Height control - Bonzi drenches proved to be the most effective of all treatments for suppressing plant height in regnelli and triangularis. Sumagic drenches of 0.10 mg/pot were as effective as the Bonzi treatments in reducing the height of regnelli pink. The other concentrations of Sumagic did reduce the height in both varieties, but their effects were not as noticeable as were the Bonzi treatments. It was also determined that A'Rest should not be used on these species due to its cost and inactivity. Oxalis growers can use Bonzi drenches in the range of 0.05 to 0.1 mg/4 1/2" pot to "stop" further growth once a desired height is reached. Early drenching of Bonzi is to be avoided since this would probably cause severe stunting.
Insects
Oxalis are almost disease free, but will attract insects in warmer temperatures. The following product is advised for spiders - Pentac 50
wettable powder - 8 ounces per 100 gallons of water, 2 applications per week for two weeks.
Marketing
Plants are ready to market when foliage is fully expanded. It is not necessary to have flowers present.
More Details

How To Plant
Dig hole 1/3 larger than root system or bulb and make the hole 2-3 " deep. Add a thin layer of base soil back in the bottom of the hole.
Root systems (rhizomes) like Trillium and Virginia Blue Bells should be placed on their side, but bulbs and corms should be placed
upright in the hole so that the pointed end is upwards. Fill with soil and water thoroughly.
Watering
Water every three to four days for the first week if it does not rain.


Where To Plant
Bleeding heart will grow best in partial to full shade. Ideally, bleeding heart should have morning sun and afternoon shade for best flowering.
How To Plant
Bleeding heart prefer a well draining, slightly acidic soil (pH 6.0 to 6.5), but will tolerate a pH up to 7.5. Apply compost or a general purpose, granular fertilizer in spring. Plant bareroot bleeding heart with the crown 1-2" below the soil line. If grown in poorly drained, wet soil, the crowns of the plants may rot. Avoid these soils and allow good air circulation.
More Details

Where to Plant:
Choose a location that receives light to moderate shade. Avoid full sun.
How to Plant:
Astilbe prefer rich, well draining soil. Amend heavy soils with peat moss, perlite, compost, or course sand to improve drainage. Plant astilbe so that the crown is at the same level as the top of the soil. Make sure the holes are twice as wide as the plants and 4 to 6 inches deep. Place the plants so that the roots are fanned slightly and pointing downwards, with the crown planted 1 to 2 inches below the ground level. Cover the roots with soil and press firmly.
Water:
Keep soil consistantly moist, but avoid over watering. Do not allow to dry out between waterings.
More Details

Deciduous and evergreen tuberous-rooted plants with strap-shaped leaves. Clusters of white funnel-shaped flowers.
More Details")
Where to Plant:
Choose a location that receives light to moderate shade. Avoid full sun.
How to Plant:
Astilbe prefer rich, well draining soil. Amend heavy soils with peat moss, perlite, compost, or course sand to improve drainage. Plant astilbe so that the crown is at the same level as the top of the soil. Make sure the holes are twice as wide as the plants and 4 to 6 inches deep. Place the plants so that the roots are fanned slightly and pointing downwards, with the crown planted 1 to 2 inches below the ground level. Cover the roots with soil and press firmly.
Water:
Keep soil consistantly moist, but avoid over watering. Do not allow to dry out between waterings.
More Details
Where To Plant
Bleeding heart will grow best in partial to full shade. Ideally, bleeding heart should have morning sun and afternoon shade for best flowering.
How To Plant
Bleeding heart prefer a well draining, slightly acidic soil (pH 6.0 to 6.5), but will tolerate a pH up to 7.5. Apply compost or a general purpose, granular fertilizer in spring. Plant bareroot bleeding heart with the crown 1-2" below the soil line. If grown in poorly drained, wet soil, the crowns of the plants may rot. Avoid these soils and allow good air circulation.
More Details
How To Plant
Geraniums prefer full sun and a well-drained, moderately rich soil. They can handle partial shade, but become more prone to mildew if kept damp. Geraniums are not particular about soil pH, but a neutral to slightly acid soil is ideal. (5.8 - 7.0)
Mid Season Care
Shearing plants back to basal growth after blooming will improve their look and encourage reblooming. The plants fill back in within weeks.
More Details
Soil and Preparation:
Plant hostas in well-drained, slightly acidic, soil (pH of 5.8 to 6.5). A high, “basic” pH of over 7.2 can change the leaf color.
Avoid planting hostas in a poorly drained location. Root and crown rot are prevalent in hostas planted in such sites.
Planting:
Dig a hole large enough to accommodate the root mass, usually about 6-8" deep. Once the hole is prepared, place the daylily upright, it into the space.
Holding it so the crown (top of the roots) is level with the surrounding surface, spread the roots out in the hole and loosely push soil over the roots.
Fertilization During Growing:
They do not require fertilization other than a yearly addition of compost unless a soil test shows a deficiency in nutrients.