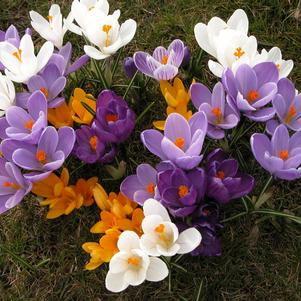
Crocus - Pre-Order for Fall 2024
Crocus - Pre-Order for Fall 2024
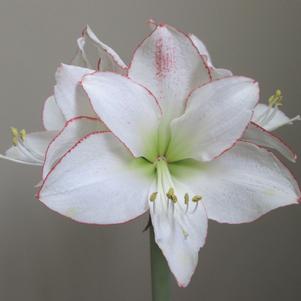
Hippeastrum Holland 'Picotee Petticoat'
Amaryllis - Pre-Order for Fall 2024
Pre-Order for Fall 2024
We carry 356 plants that match your search request. We've included all matches below. Click on any plant to learn additional details.

Asiatic and Oriental hybrid lily bulbs used for cut flower forcing can be forced on a year-round basis by using a combination of precooled and frozen-in bulbs. The number of cultivars available is constantly changing. Generally, the asiatics force in 8-10 weeks. Oriental and auratum lilies force in 12-15 weeks and are available until June 30th.
On Arrival
After being programmed, forcers should be prepared to plant bulbs immediately on arrival. If they must be stored, place them at 32-35 ° F. Storage at higher temperatures will cause desiccation of the bulbs which will result in fewer flowers per stem. Forcers should always check to be certain the bulbs are not seriously damaged or diseased. Do not store for longer than 10 days. DO NOT REFREEZE.
Planting and Spacing
The planting medium should be sterile, well drained and have a pH of 5.5 to 7.5 with pH 7.0 being preferred. Because some lilies can develop leaf scorch due to soil borne fluoride, the medium should not contain superphosphate or perlite. If ground beds or raised benches are used, be certain to sterilize them and be sure they are low in soluble salts. Leaching may be necessary. They must be well drained. Bulbs for cut flowers can be planted in ground beds, 8-10" deep raised beds or standard pots. Plant bulbs with at least 2" of planting medium above the bulb nose. This is necessary to develop stem roots.
Suggested Number of bulbs for Cut Flower Forcing in Beds or Raised Benches:
Asiatic Hybrids
12/14 cm 6-9 per sq ft
14/16 cm 5-8 per sq ft
Oriental Hybrids
16/18 cm 4-6 per sq ft
18/20 cm 4-5 per sq ft
Support System:
Because of their length and variation in stem strength, some cut lily cultivars may need wire support systems. If used, be certain the netting has holes large enough to accommodate easy cutting and removal of the flowers. Also, place the netting over the bulbs directly after planting.
Watering:
Water the planting medium thoroughly after planting and then keep the medium moist but not wet.
Light:
Lilies require a medium to high Light (>2500 ft candle) intensity greenhouse, especially during the short days of winter. If shading was used during the summer, be certain to clean the glass thoroughly before winter. In most instances lilies respond to HID lighting during the winter months. This aids in reducing flower abortion and abscission especially with sensitive cultivars. Forcers who have low light intensity winters should seriously consider installing an HID lighting system for forcing cut lilies. When very high light condition occur (spring/summer), screening or shading is advised. Extremely high light intensities can reduce the length of the cut flower.
Use 55-63° F (13-17° C) night temperatures and not higher than 70° F (21° C) day temperatures. Avoid great fluctuations in temperature, because this can help to promote leaf scorch. Also, whenever possible, start Orientals at 59° F (15° C) for about 4 weeks. Later, Orientals can be forced at higher temperatures (63-65° F/17-18° C) than Asiatics. In general, Asiatic and longiflorum lilies take 30-35 days to flower after they reach the visible bud stage of development and Orientals take 50-55 days. Lastly, when seasonally warm temperatures occur, try to keep the soil and air temperatures below 68° F (20° C). Mulching of ground or raised bed and shading are advised. Ground or raised bed and shading are advised. Use a well ventilated greenhouse. Do not permit humidity to build up.
The bulbs themselves contain lots of stored food, and they should be able to support the plant until the shoot emerges. Recommendations suggest withholding fertilizer until the shoot is 4-6" tall. Some growers incorporate a 10-6-4 slow release fertilizer in the medium prior to planting. Suggested rate is eight pounds per cubic yard. Use a liquid fertilizer such as 16-4-12 at the rate of 200 ppm to help deepen foliage color. If a preplant fertilizer has been added to the soil, then just use the liquid fertilizer every two weeks.
Growing in the Summertime:
It is very important that the stem roots are developed before exposing the lilies to warm summer temperatures. Keep the planted bulbs for 3-4 weeks at or below 65°F to allow the roots to grow. This can be done in a bulb cooler or cool basement. Bulbs that have a poor root system will flower unevenly and have a lot of bloom dropping.
Marketing, Harvesting and Storage:
Forcers - as soon as the first flower has fully developed color, but is not open, the plants should be cut. Care must be taken not to damage the unopened buds during marketing. Whenever possible, lilies should not be stored.
More Details
densely clustered flat flower buds start as pale pink, maturing to rosy red
More Details


How To Plant
Dig hole 1/3 larger than root system or bulb and make the hole 2-3 " deep. Add a thin layer of base soil back in the bottom of the hole.
Root systems (rhizomes) like Trillium and Virginia Blue Bells should be placed on their side, but bulbs and corms should be placed
upright in the hole so that the pointed end is upwards. Fill with soil and water thoroughly.
Watering
Water every three to four days for the first week if it does not rain.


clusters of blue flower spikes. Do not plant near vegetable gardens - all parts of plant are poisonous.
More Details
Deciduous and evergreen tuberous-rooted plants with strap-shaped leaves. Clusters of white funnel-shaped flowers.
More Details
Soil Preparation and Planting
Best grown in fertile, humusy, organically rich, medium to wet soils in part shade or filtered sun. In general, green types can take higher light levels; dark-leaved ones need shade. Once nighttime temperatures are consistently 50-60° F, plant each bulb 6-8" deep and 2-4 feet apart. Water generously.
Fertilization
Fertilize Colocasia every three weeks during fall and winter. Use a liquid plant food with a balanced N-P-K ratio such as 10-10-10 or 20-20-20, diluted to half the strength recommended on the label. Water the fertilizer deeply into the soil immediately after application.
Water
Elephant ears are high water plants. Water as needed to keep the soil consistently moist, and don't allow the soil to become dry. Colocasia likes wet soil and is even appropriate for planting next to a pond, or in water up to 6 inches deep. Check the soil often if the bulbs are planted in sunlight.
Fall Care and Storage
Dig Colocasia bulbs after the first frost in autumn if you live in a climate with cold winters. Cut the foliage down to 2 to 4 inches before cutting. Allow the bulbs to dry for a day, and then place the bulbs in a box of wood shavings or peat moss. Store the box where the temperatures don't drop below 45°F.
More Details
")
Where to Plant:
Choose a location that receives light to moderate shade. Avoid full sun.
How to Plant:
Astilbe prefer rich, well draining soil. Amend heavy soils with peat moss, perlite, compost, or course sand to improve drainage. Plant astilbe so that the crown is at the same level as the top of the soil. Make sure the holes are twice as wide as the plants and 4 to 6 inches deep. Place the plants so that the roots are fanned slightly and pointing downwards, with the crown planted 1 to 2 inches below the ground level. Cover the roots with soil and press firmly.
Water:
Keep soil consistantly moist, but avoid over watering. Do not allow to dry out between waterings.
More Details")
Where to Plant:
Choose a location that receives light to moderate shade. Avoid full sun.
How to Plant:
Astilbe prefer rich, well draining soil. Amend heavy soils with peat moss, perlite, compost, or course sand to improve drainage. Plant astilbe so that the crown is at the same level as the top of the soil. Make sure the holes are twice as wide as the plants and 4 to 6 inches deep. Place the plants so that the roots are fanned slightly and pointing downwards, with the crown planted 1 to 2 inches below the ground level. Cover the roots with soil and press firmly.
Water:
Keep soil consistantly moist, but avoid over watering. Do not allow to dry out between waterings.
More Details
shiny green foliage, clear blue flowers
More Details
Caladiums require a warm, moist soil. A minimum of soil temperature of 78-80 F is preferred. If planted too early in spring, cool soil temperatures will cause tubers to rot before they sprout. They can be started indoors in moist peat moss or potting soil in containers such as a shallow flat or flower pot. Barely cover tubers with soil and place the container in a warm germination room with bright light. Tubers should be started indoors approximately four weeks before planting outdoors.
More Details
Soil Preparation and Planting
Best grown in fertile, humusy, organically rich, medium to wet soils in part shade or filtered sun. In general, green types can take higher light levels; dark-leaved ones need shade. Once nighttime temperatures are consistently 50-60° F, plant each bulb 6-8" deep and 2-4 feet apart. Water generously.
Fertilization
Fertilize Colocasia every three weeks during fall and winter. Use a liquid plant food with a balanced N-P-K ratio such as 10-10-10 or 20-20-20, diluted to half the strength recommended on the label. Water the fertilizer deeply into the soil immediately after application.
Water
Elephant ears are high water plants. Water as needed to keep the soil consistently moist, and don't allow the soil to become dry. Colocasia likes wet soil and is even appropriate for planting next to a pond, or in water up to 6 inches deep. Check the soil often if the bulbs are planted in sunlight.
Fall Care and Storage
Dig Colocasia bulbs after the first frost in autumn if you live in a climate with cold winters. Cut the foliage down to 2 to 4 inches before cutting. Allow the bulbs to dry for a day, and then place the bulbs in a box of wood shavings or peat moss. Store the box where the temperatures don't drop below 45°F.
More Details
Where To Plant
For best growth, plant convallaria in well drainging soil where they will receive light to moderate shade. Amend soil with compost or
other organic material to improve drainage.
How To Plant
Plant roots so that the tops just barely poke above the soil. Water generously to settle soil around the roots.


Where To Plant
Bleeding heart will grow best in partial to full shade. Ideally, bleeding heart should have morning sun and afternoon shade for best flowering.
How To Plant
Bleeding heart prefer a well draining, slightly acidic soil (pH 6.0 to 6.5), but will tolerate a pH up to 7.5. Apply compost or a general purpose, granular fertilizer in spring. Plant bareroot bleeding heart with the crown 1-2" below the soil line. If grown in poorly drained, wet soil, the crowns of the plants may rot. Avoid these soils and allow good air circulation.
More Details
Where To Plant
Bleeding heart will grow best in partial to full shade. Ideally, bleeding heart should have morning sun and afternoon shade for best flowering.
How To Plant
Bleeding heart prefer a well draining, slightly acidic soil (pH 6.0 to 6.5), but will tolerate a pH up to 7.5. Apply compost or a general purpose, granular fertilizer in spring. Plant bareroot bleeding heart with the crown 1-2" below the soil line. If grown in poorly drained, wet soil, the crowns of the plants may rot. Avoid these soils and allow good air circulation.
More Details


How To Plant
Geraniums prefer full sun and a well-drained, moderately rich soil. They can handle partial shade, but become more prone to mildew if kept damp. Geraniums are not particular about soil pH, but a neutral to slightly acid soil is ideal. (5.8 - 7.0)
Mid Season Care
Shearing plants back to basal growth after blooming will improve their look and encourage reblooming. The plants fill back in within weeks.
More Details
Soil and Preparation:
Daylilies flower best when planted in full sun (6 hours/day), with moist, yet well-drained soil. Daylilies will grow in a wide range of soils, from sand to heavy clay, and in a wide range of soil pHs. Clay soils can be improved by the addition of compost, humus or peat moss, or sand which will help make it more friable. Sandy soil will benefit from the addition of compost, humus or peat moss which will serve to increase water retention. Amend the soil withcompost before planting. Space plants 12 to 18 inches apart and plant so the crown is about 1 inch below the soil surface. Water well and mulch with bark or straw to conserve moisture and prevent weeds from growing.
Planting:
Dig a hole large enough to accommodate the root mass, usually about 6-8" deep. Once the hole is prepared, place the daylily upright, without cramming it into the space. Holding it so the crown (top of the roots) is about one inch below the surface of the ground, spread the roots out in the hole and loosely push soil over the roots until the hole is nearly full. Press the soil down around the roots, without covering any green of the plant. Leave a slight depression, or water reservoir, around the plant, about 1/2" deep.
Watering:
Watering is most important in spring when the plants are making scapes and buds, and in the summer during the bloom season. Daylilies benefit more from deep watering, which reaches 8 to 10 inches into the soil, than from a succession of brief, surface waterings.
Fertilization During Growing:
They do not require fertilization other than a yearly addition of compost.
More Details