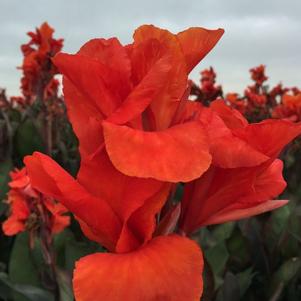
Canna
Canna
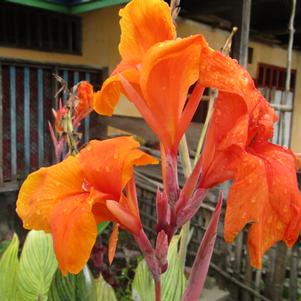
Canna
We carry 53 plants that match your search request. We've included all matches below. Click on any plant to learn additional details.

Soil and Preparation:
Daylilies flower best when planted in full sun (6 hours/day), with moist, yet well-drained soil. Daylilies will grow in a wide range of soils, from sand to heavy clay, and in a wide range of soil pHs. Clay soils can be improved by the addition of compost, humus or peat moss, or sand which will help make it more friable. Sandy soil will benefit from the addition of compost, humus or peat moss which will serve to increase water retention. Amend the soil withcompost before planting. Space plants 12 to 18 inches apart and plant so the crown is about 1 inch below the soil surface. Water well and mulch with bark or straw to conserve moisture and prevent weeds from growing.
Planting:
Dig a hole large enough to accommodate the root mass, usually about 6-8" deep. Once the hole is prepared, place the daylily upright, without cramming it into the space. Holding it so the crown (top of the roots) is about one inch below the surface of the ground, spread the roots out in the hole and loosely push soil over the roots until the hole is nearly full. Press the soil down around the roots, without covering any green of the plant. Leave a slight depression, or water reservoir, around the plant, about 1/2" deep.
Watering:
Watering is most important in spring when the plants are making scapes and buds, and in the summer during the bloom season. Daylilies benefit more from deep watering, which reaches 8 to 10 inches into the soil, than from a succession of brief, surface waterings.
Fertilization During Growing:
They do not require fertilization other than a yearly addition of compost.
More Details
Soil and Preparation
Peonies prefer well-draining, humus-rich moist soil. Amend heavy or very sandy soil with compost. Additionally, 1 cup of bonemeal can be used to amend the soil prior to planting. Choose a location in full sun, but one that provides ample growing room along with protection from strong winds.
Planting
Dig a a hole large enough to accommodate the roots and set the root so the eyes face upward. Fill in the hole, making sure to keep the peony's eyes/buds not deeper than 2" below the soil line. Water thoroughly to settle the soil around the roots.
Fertilization During Growing
They do not require fertilization other than a yearly addition of compost unless a soil test shows a deficiency in nutrients.
Cutting Guidelines
Years 1 & 2: Do not cut any blooms. Dis-budding is recommended to encourage root growth and overall plant development.
Year 3: For 2/3 eye roots - Cut 1/3 of the total blooms; For 3/5 eye roots - Cut 50% of the blooms
Year 4: Cut 70% of the total blooms
More Details
Soil and Preparation:
Daylilies flower best when planted in full sun (6 hours/day), with moist, yet well-drained soil. Daylilies will grow in a wide range of soils, from sand to heavy clay, and in a wide range of soil pHs. Clay soils can be improved by the addition of compost, humus or peat moss, or sand which will help make it more friable. Sandy soil will benefit from the addition of compost, humus or peat moss which will serve to increase water retention. Amend the soil withcompost before planting. Space plants 12 to 18 inches apart and plant so the crown is about 1 inch below the soil surface. Water well and mulch with bark or straw to conserve moisture and prevent weeds from growing.
Planting:
Dig a hole large enough to accommodate the root mass, usually about 6-8" deep. Once the hole is prepared, place the daylily upright, without cramming it into the space. Holding it so the crown (top of the roots) is about one inch below the surface of the ground, spread the roots out in the hole and loosely push soil over the roots until the hole is nearly full. Press the soil down around the roots, without covering any green of the plant. Leave a slight depression, or water reservoir, around the plant, about 1/2" deep.
Watering:
Watering is most important in spring when the plants are making scapes and buds, and in the summer during the bloom season. Daylilies benefit more from deep watering, which reaches 8 to 10 inches into the soil, than from a succession of brief, surface waterings.
Fertilization During Growing:
They do not require fertilization other than a yearly addition of compost.
More Details
Soil and Preparation:
Peonies prefer well-draining, humus-rich moist soil. Amend heavy or very sandy soil with compost. Additionally, 1 cup of bonemeal can be used to amend the soil prior to planting. Choose a location in full sun, but one that provides ample growing room along with protection from strong winds.
Planting:
Dig a a hole large enough to accommodate the roots and set the root so the eyes face upward. Fill in the hole, making sure to keep the peony's eyes/buds not deeper than 2" below the soil line. Water thoroughly to settle the soil around the roots.
Fertilization During Growing:
They do not require fertilization other than a yearly addition of compost unless a soil test shows a deficiency in nutrients.
More Details
Soil and Preparation:
Daylilies flower best when planted in full sun (6 hours/day), with moist, yet well-drained soil. Daylilies will grow in a wide range of soils, from sand to heavy clay, and in a wide range of soil pHs. Clay soils can be improved by the addition of compost, humus or peat moss, or sand which will help make it more friable. Sandy soil will benefit from the addition of compost, humus or peat moss which will serve to increase water retention. Amend the soil withcompost before planting. Space plants 12 to 18 inches apart and plant so the crown is about 1 inch below the soil surface. Water well and mulch with bark or straw to conserve moisture and prevent weeds from growing.
Planting:
Dig a hole large enough to accommodate the root mass, usually about 6-8" deep. Once the hole is prepared, place the daylily upright, without cramming it into the space. Holding it so the crown (top of the roots) is about one inch below the surface of the ground, spread the roots out in the hole and loosely push soil over the roots until the hole is nearly full. Press the soil down around the roots, without covering any green of the plant. Leave a slight depression, or water reservoir, around the plant, about 1/2" deep.
Watering:
Watering is most important in spring when the plants are making scapes and buds, and in the summer during the bloom season. Daylilies benefit more from deep watering, which reaches 8 to 10 inches into the soil, than from a succession of brief, surface waterings.
Fertilization During Growing:
They do not require fertilization other than a yearly addition of compost.
More Details
Soil and Preparation:
Daylilies flower best when planted in full sun (6 hours/day), with moist, yet well-drained soil. Daylilies will grow in a wide range of soils, from sand to heavy clay, and in a wide range of soil pHs. Clay soils can be improved by the addition of compost, humus or peat moss, or sand which will help make it more friable. Sandy soil will benefit from the addition of compost, humus or peat moss which will serve to increase water retention. Amend the soil withcompost before planting. Space plants 12 to 18 inches apart and plant so the crown is about 1 inch below the soil surface. Water well and mulch with bark or straw to conserve moisture and prevent weeds from growing.
Planting:
Dig a hole large enough to accommodate the root mass, usually about 6-8" deep. Once the hole is prepared, place the daylily upright, without cramming it into the space. Holding it so the crown (top of the roots) is about one inch below the surface of the ground, spread the roots out in the hole and loosely push soil over the roots until the hole is nearly full. Press the soil down around the roots, without covering any green of the plant. Leave a slight depression, or water reservoir, around the plant, about 1/2" deep.
Watering:
Watering is most important in spring when the plants are making scapes and buds, and in the summer during the bloom season. Daylilies benefit more from deep watering, which reaches 8 to 10 inches into the soil, than from a succession of brief, surface waterings.
Fertilization During Growing:
They do not require fertilization other than a yearly addition of compost.
More Details