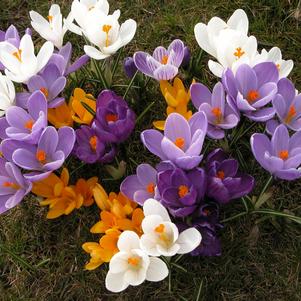
Crocus - Pre-Order for Fall 2024
Crocus - Pre-Order for Fall 2024
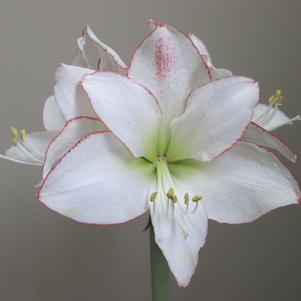
Hippeastrum Holland 'Picotee Petticoat'
Amaryllis - Pre-Order for Fall 2024
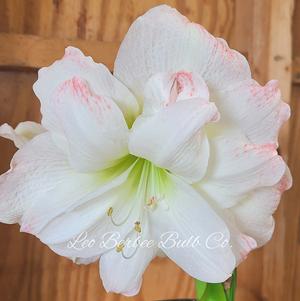
Hippeastrum Southern Hemisphere 'Amadeus'
Christmas Forcing Amaryllis - Pre-Order for Fall 2024
We carry 98 plants that match your search request. We've included all matches below. Click on any plant to learn additional details.

Asiatic and Oriental hybrid lily bulbs used for cut flower forcing can be forced on a year-round basis by using a combination of precooled and frozen-in bulbs. The number of cultivars available is constantly changing. Generally, the asiatics force in 8-10 weeks. Oriental and auratum lilies force in 12-15 weeks and are available until June 30th.
On Arrival
After being programmed, forcers should be prepared to plant bulbs immediately on arrival. If they must be stored, place them at 32-35 ° F. Storage at higher temperatures will cause desiccation of the bulbs which will result in fewer flowers per stem. Forcers should always check to be certain the bulbs are not seriously damaged or diseased. Do not store for longer than 10 days. DO NOT REFREEZE.
Planting and Spacing
The planting medium should be sterile, well drained and have a pH of 5.5 to 7.5 with pH 7.0 being preferred. Because some lilies can develop leaf scorch due to soil borne fluoride, the medium should not contain superphosphate or perlite. If ground beds or raised benches are used, be certain to sterilize them and be sure they are low in soluble salts. Leaching may be necessary. They must be well drained. Bulbs for cut flowers can be planted in ground beds, 8-10" deep raised beds or standard pots. Plant bulbs with at least 2" of planting medium above the bulb nose. This is necessary to develop stem roots.
Suggested Number of bulbs for Cut Flower Forcing in Beds or Raised Benches:
Asiatic Hybrids
12/14 cm 6-9 per sq ft
14/16 cm 5-8 per sq ft
Oriental Hybrids
16/18 cm 4-6 per sq ft
18/20 cm 4-5 per sq ft
Support System:
Because of their length and variation in stem strength, some cut lily cultivars may need wire support systems. If used, be certain the netting has holes large enough to accommodate easy cutting and removal of the flowers. Also, place the netting over the bulbs directly after planting.
Watering:
Water the planting medium thoroughly after planting and then keep the medium moist but not wet.
Light:
Lilies require a medium to high Light (>2500 ft candle) intensity greenhouse, especially during the short days of winter. If shading was used during the summer, be certain to clean the glass thoroughly before winter. In most instances lilies respond to HID lighting during the winter months. This aids in reducing flower abortion and abscission especially with sensitive cultivars. Forcers who have low light intensity winters should seriously consider installing an HID lighting system for forcing cut lilies. When very high light condition occur (spring/summer), screening or shading is advised. Extremely high light intensities can reduce the length of the cut flower.
Use 55-63° F (13-17° C) night temperatures and not higher than 70° F (21° C) day temperatures. Avoid great fluctuations in temperature, because this can help to promote leaf scorch. Also, whenever possible, start Orientals at 59° F (15° C) for about 4 weeks. Later, Orientals can be forced at higher temperatures (63-65° F/17-18° C) than Asiatics. In general, Asiatic and longiflorum lilies take 30-35 days to flower after they reach the visible bud stage of development and Orientals take 50-55 days. Lastly, when seasonally warm temperatures occur, try to keep the soil and air temperatures below 68° F (20° C). Mulching of ground or raised bed and shading are advised. Ground or raised bed and shading are advised. Use a well ventilated greenhouse. Do not permit humidity to build up.
The bulbs themselves contain lots of stored food, and they should be able to support the plant until the shoot emerges. Recommendations suggest withholding fertilizer until the shoot is 4-6" tall. Some growers incorporate a 10-6-4 slow release fertilizer in the medium prior to planting. Suggested rate is eight pounds per cubic yard. Use a liquid fertilizer such as 16-4-12 at the rate of 200 ppm to help deepen foliage color. If a preplant fertilizer has been added to the soil, then just use the liquid fertilizer every two weeks.
Growing in the Summertime:
It is very important that the stem roots are developed before exposing the lilies to warm summer temperatures. Keep the planted bulbs for 3-4 weeks at or below 65°F to allow the roots to grow. This can be done in a bulb cooler or cool basement. Bulbs that have a poor root system will flower unevenly and have a lot of bloom dropping.
Marketing, Harvesting and Storage:
Forcers - as soon as the first flower has fully developed color, but is not open, the plants should be cut. Care must be taken not to damage the unopened buds during marketing. Whenever possible, lilies should not be stored.
More Details
On Arrival
After being programmed, forcers should be prepared to plant bulbs when they arrive. If they must be stored, place at 32-35° F. Forcers should always check to be certain the bulbs are not seriously damaged or diseased. Do not store for longer than 10 days. DO NOT REFREEZE!!
Planting
In all cases, the planting media should be sterile, well drained, have a pH of 6.5 to 7.5 with pH of 7.0 being preferred. Because some lilies can develop leaf scorch due to soil borne fluoride, the medium should not contain superphosphate or perlite. Dip for 30 minutes with one of the three following recommended formulas:
For potted plants, use standard pots and plant bulbs so there is 2 inches of planting medium above the bulb nose. This is necessary to develop stem roots.
Suggested Number of Bulbs Per Pot
12/14 cm. 3 per 6 inch (15 cm) pot
14/16 cm. 1-2 per 6 inch (15 cm) pot
16/18 cm. 1 per 6 inch (15 cm) pot
Light
Lilies require a medium to high Light (>2500 ft candle) intensity greenhouse, especially during the short days of winter. If shading was used during the summer, be certain to clean the glass thoroughly before winter. In most instances lilies respond to HID lighting during the winter months. This aids in reducing flower abortion and abscission especially with sensitive cultivars. Forcers who have lowlight intensity winters should seriously consider installing an HID lighting system for forcing cut lilies. Use light 4-8 hours per day. When very high light conditions occur (spring/summer), screening or shading is advised.
Watering
Water the planting medium thoroughly after planting and then keep the medium moist, but not wet.
Growing in the Summertime
It is very important that the stem roots are developed before exposing the lilies to warm summer temperatures. Keep the planted bulbs for 3-4 weeks at or below 65°F to allow the roots to grow. This can be done in a bulb cooler or cool basement. Bulbs that have a poor root system will flower unevenly and have a lot of bloom dropping.
Temperature
Use 55-63°F night temperatures and not higher than 70°F day temperatures. Avoid great fluctuations in temperature, because this can help to promote leaf scorch. Whenever possible, start Orientals at 59°F for about 4 weeks. Later, Orientals can be forced at higher temperatures (63-65°F) than Asiatics. In general, Asiatic and longiflorum lilies take 30-35 days to flower after they reach the visible bud stage of development and Orientals take 50-55 days. When seasonally warm temperatures occur, try to keep the soil and air temperatures below 68° F. Use shading when necessary.
Ventilation
Use a well ventilated greenhouse. Do not permit humidity to build up.
Fertilizer
The bulbs themselves contain lots of stored food, and they should be able to support the plant until the shoot emerges. Recommendations suggest withholding fertilizer until the shoot is 4-6" tall. Some growers incorporate a 10-6-4 slow release fertilizer in the medium prior to planting. Suggested rate is eight pounds per cubic yard. Use a liquid fertilizer such as 16-4-12 at the rate of 200 ppm to help deepen foliage color. If a preplant fertilizer has been added to the soil, then just use the liquid fertilizer every two weeks. A well fertilized lily tends to be shorter than an under fertilized plant.
Plant Growth Retardants
Height control is one of the more difficult aspects of pot lily forcing. Forcers need to rely greatly on their past experiences with the various cultivars and then decide whether or not to use ancymidol (A'Rest), Bonzi, Sumagic, or any other approved growth retardant. If soil drenches are to be used, split applications are usually best. Also, the pH of the medium needs to be about 7.0 to get the most effective response of the soil drenches, particularly for A'Rest. The first to be applied at shoot emergence, the second 10-14 days later. Foliar sprays can also be used. In addition there has been research conducted on preplant bulb dips. If EPA approved, forcers should experiment with the procedure to determine the best rate and length of the bulb dip to use for their forcing conditions and cultivars used.
Marketing and Storage
Forcers - plants should be marketed as soon as first flower begins to color. This insures that the consumer will receive maximum enjoyment. Care must be taken not to damage the unopened buds during marketing. Storage should be kept to a minimum. If they must be stored, place them at 35-40°F when the first flower is fully colored, but not open.
According to Cornell University trials a 50 ppm application of facination 2 days before storage will prevent leaves from yellowing.
More Details
Asiatic and Oriental hybrid lily bulbs used for cut flower forcing can be forced on a year-round basis by using a combination of precooled and frozen-in bulbs. The number of cultivars available is constantly changing. Generally, the asiatics force in 8-10 weeks. Oriental and auratum lilies force in 12-15 weeks and are available until June 30th.
On Arrival
After being programmed, forcers should be prepared to plant bulbs immediately on arrival. If they must be stored, place them at 32-35 ° F. Storage at higher temperatures will cause desiccation of the bulbs which will result in fewer flowers per stem. Forcers should always check to be certain the bulbs are not seriously damaged or diseased. Do not store for longer than 10 days. DO NOT REFREEZE.
Planting and Spacing
The planting medium should be sterile, well drained and have a pH of 5.5 to 7.5 with pH 7.0 being preferred. Because some lilies can develop leaf scorch due to soil borne fluoride, the medium should not contain superphosphate or perlite. If ground beds or raised benches are used, be certain to sterilize them and be sure they are low in soluble salts. Leaching may be necessary. They must be well drained. Bulbs for cut flowers can be planted in ground beds, 8-10" deep raised beds or standard pots. Plant bulbs with at least 2" of planting medium above the bulb nose. This is necessary to develop stem roots.
Suggested Number of bulbs for Cut Flower Forcing in Beds or Raised Benches:
Asiatic Hybrids
12/14 cm 6-9 per sq ft
14/16 cm 5-8 per sq ft
Oriental Hybrids
16/18 cm 4-6 per sq ft
18/20 cm 4-5 per sq ft
Support System:
Because of their length and variation in stem strength, some cut lily cultivars may need wire support systems. If used, be certain the netting has holes large enough to accommodate easy cutting and removal of the flowers. Also, place the netting over the bulbs directly after planting.
Watering:
Water the planting medium thoroughly after planting and then keep the medium moist but not wet.
Light:
Lilies require a medium to high Light (>2500 ft candle) intensity greenhouse, especially during the short days of winter. If shading was used during the summer, be certain to clean the glass thoroughly before winter. In most instances lilies respond to HID lighting during the winter months. This aids in reducing flower abortion and abscission especially with sensitive cultivars. Forcers who have low light intensity winters should seriously consider installing an HID lighting system for forcing cut lilies. When very high light condition occur (spring/summer), screening or shading is advised. Extremely high light intensities can reduce the length of the cut flower.
Use 55-63° F (13-17° C) night temperatures and not higher than 70° F (21° C) day temperatures. Avoid great fluctuations in temperature, because this can help to promote leaf scorch. Also, whenever possible, start Orientals at 59° F (15° C) for about 4 weeks. Later, Orientals can be forced at higher temperatures (63-65° F/17-18° C) than Asiatics. In general, Asiatic and longiflorum lilies take 30-35 days to flower after they reach the visible bud stage of development and Orientals take 50-55 days. Lastly, when seasonally warm temperatures occur, try to keep the soil and air temperatures below 68° F (20° C). Mulching of ground or raised bed and shading are advised. Ground or raised bed and shading are advised. Use a well ventilated greenhouse. Do not permit humidity to build up.
The bulbs themselves contain lots of stored food, and they should be able to support the plant until the shoot emerges. Recommendations suggest withholding fertilizer until the shoot is 4-6" tall. Some growers incorporate a 10-6-4 slow release fertilizer in the medium prior to planting. Suggested rate is eight pounds per cubic yard. Use a liquid fertilizer such as 16-4-12 at the rate of 200 ppm to help deepen foliage color. If a preplant fertilizer has been added to the soil, then just use the liquid fertilizer every two weeks.
Growing in the Summertime:
It is very important that the stem roots are developed before exposing the lilies to warm summer temperatures. Keep the planted bulbs for 3-4 weeks at or below 65°F to allow the roots to grow. This can be done in a bulb cooler or cool basement. Bulbs that have a poor root system will flower unevenly and have a lot of bloom dropping.
Marketing, Harvesting and Storage:
Forcers - as soon as the first flower has fully developed color, but is not open, the plants should be cut. Care must be taken not to damage the unopened buds during marketing. Whenever possible, lilies should not be stored.
More Details
On Arrival
After being programmed, forcers should be prepared to plant bulbs when they arrive. If they must be stored, place at 32-35° F. Forcers should always check to be certain the bulbs are not seriously damaged or diseased. Do not store for longer than 10 days. DO NOT REFREEZE!!
Planting
In all cases, the planting media should be sterile, well drained, have a pH of 6.5 to 7.5 with pH of 7.0 being preferred. Because some lilies can develop leaf scorch due to soil borne fluoride, the medium should not contain superphosphate or perlite. Dip for 30 minutes with one of the three following recommended formulas:
For potted plants, use standard pots and plant bulbs so there is 2 inches of planting medium above the bulb nose. This is necessary to develop stem roots.
Suggested Number of Bulbs Per Pot
12/14 cm. 3 per 6 inch (15 cm) pot
14/16 cm. 1-2 per 6 inch (15 cm) pot
16/18 cm. 1 per 6 inch (15 cm) pot
Light
Lilies require a medium to high Light (>2500 ft candle) intensity greenhouse, especially during the short days of winter. If shading was used during the summer, be certain to clean the glass thoroughly before winter. In most instances lilies respond to HID lighting during the winter months. This aids in reducing flower abortion and abscission especially with sensitive cultivars. Forcers who have lowlight intensity winters should seriously consider installing an HID lighting system for forcing cut lilies. Use light 4-8 hours per day. When very high light conditions occur (spring/summer), screening or shading is advised.
Watering
Water the planting medium thoroughly after planting and then keep the medium moist, but not wet.
Growing in the Summertime
It is very important that the stem roots are developed before exposing the lilies to warm summer temperatures. Keep the planted bulbs for 3-4 weeks at or below 65°F to allow the roots to grow. This can be done in a bulb cooler or cool basement. Bulbs that have a poor root system will flower unevenly and have a lot of bloom dropping.
Temperature
Use 55-63°F night temperatures and not higher than 70°F day temperatures. Avoid great fluctuations in temperature, because this can help to promote leaf scorch. Whenever possible, start Orientals at 59°F for about 4 weeks. Later, Orientals can be forced at higher temperatures (63-65°F) than Asiatics. In general, Asiatic and longiflorum lilies take 30-35 days to flower after they reach the visible bud stage of development and Orientals take 50-55 days. When seasonally warm temperatures occur, try to keep the soil and air temperatures below 68° F. Use shading when necessary.
Ventilation
Use a well ventilated greenhouse. Do not permit humidity to build up.
Fertilizer
The bulbs themselves contain lots of stored food, and they should be able to support the plant until the shoot emerges. Recommendations suggest withholding fertilizer until the shoot is 4-6" tall. Some growers incorporate a 10-6-4 slow release fertilizer in the medium prior to planting. Suggested rate is eight pounds per cubic yard. Use a liquid fertilizer such as 16-4-12 at the rate of 200 ppm to help deepen foliage color. If a preplant fertilizer has been added to the soil, then just use the liquid fertilizer every two weeks. A well fertilized lily tends to be shorter than an under fertilized plant.
Plant Growth Retardants
Height control is one of the more difficult aspects of pot lily forcing. Forcers need to rely greatly on their past experiences with the various cultivars and then decide whether or not to use ancymidol (A'Rest), Bonzi, Sumagic, or any other approved growth retardant. If soil drenches are to be used, split applications are usually best. Also, the pH of the medium needs to be about 7.0 to get the most effective response of the soil drenches, particularly for A'Rest. The first to be applied at shoot emergence, the second 10-14 days later. Foliar sprays can also be used. In addition there has been research conducted on preplant bulb dips. If EPA approved, forcers should experiment with the procedure to determine the best rate and length of the bulb dip to use for their forcing conditions and cultivars used.
Marketing and Storage
Forcers - plants should be marketed as soon as first flower begins to color. This insures that the consumer will receive maximum enjoyment. Care must be taken not to damage the unopened buds during marketing. Storage should be kept to a minimum. If they must be stored, place them at 35-40°F when the first flower is fully colored, but not open.
According to Cornell University trials a 50 ppm application of facination 2 days before storage will prevent leaves from yellowing.
More Details
Asiatic and Oriental hybrid lily bulbs used for cut flower forcing can be forced on a year-round basis by using a combination of precooled and frozen-in bulbs. The number of cultivars available is constantly changing. Generally, the asiatics force in 8-10 weeks. Oriental and auratum lilies force in 12-15 weeks and are available until June 30th.
On Arrival
After being programmed, forcers should be prepared to plant bulbs immediately on arrival. If they must be stored, place them at 32-35 ° F. Storage at higher temperatures will cause desiccation of the bulbs which will result in fewer flowers per stem. Forcers should always check to be certain the bulbs are not seriously damaged or diseased. Do not store for longer than 10 days. DO NOT REFREEZE.
Planting and Spacing
The planting medium should be sterile, well drained and have a pH of 5.5 to 7.5 with pH 7.0 being preferred. Because some lilies can develop leaf scorch due to soil borne fluoride, the medium should not contain superphosphate or perlite. If ground beds or raised benches are used, be certain to sterilize them and be sure they are low in soluble salts. Leaching may be necessary. They must be well drained. Bulbs for cut flowers can be planted in ground beds, 8-10" deep raised beds or standard pots. Plant bulbs with at least 2" of planting medium above the bulb nose. This is necessary to develop stem roots.
Suggested Number of bulbs for Cut Flower Forcing in Beds or Raised Benches:
Asiatic Hybrids
12/14 cm 6-9 per sq ft
14/16 cm 5-8 per sq ft
Oriental Hybrids
16/18 cm 4-6 per sq ft
18/20 cm 4-5 per sq ft
Support System:
Because of their length and variation in stem strength, some cut lily cultivars may need wire support systems. If used, be certain the netting has holes large enough to accommodate easy cutting and removal of the flowers. Also, place the netting over the bulbs directly after planting.
Watering:
Water the planting medium thoroughly after planting and then keep the medium moist but not wet.
Light:
Lilies require a medium to high Light (>2500 ft candle) intensity greenhouse, especially during the short days of winter. If shading was used during the summer, be certain to clean the glass thoroughly before winter. In most instances lilies respond to HID lighting during the winter months. This aids in reducing flower abortion and abscission especially with sensitive cultivars. Forcers who have low light intensity winters should seriously consider installing an HID lighting system for forcing cut lilies. When very high light condition occur (spring/summer), screening or shading is advised. Extremely high light intensities can reduce the length of the cut flower.
Use 55-63° F (13-17° C) night temperatures and not higher than 70° F (21° C) day temperatures. Avoid great fluctuations in temperature, because this can help to promote leaf scorch. Also, whenever possible, start Orientals at 59° F (15° C) for about 4 weeks. Later, Orientals can be forced at higher temperatures (63-65° F/17-18° C) than Asiatics. In general, Asiatic and longiflorum lilies take 30-35 days to flower after they reach the visible bud stage of development and Orientals take 50-55 days. Lastly, when seasonally warm temperatures occur, try to keep the soil and air temperatures below 68° F (20° C). Mulching of ground or raised bed and shading are advised. Ground or raised bed and shading are advised. Use a well ventilated greenhouse. Do not permit humidity to build up.
The bulbs themselves contain lots of stored food, and they should be able to support the plant until the shoot emerges. Recommendations suggest withholding fertilizer until the shoot is 4-6" tall. Some growers incorporate a 10-6-4 slow release fertilizer in the medium prior to planting. Suggested rate is eight pounds per cubic yard. Use a liquid fertilizer such as 16-4-12 at the rate of 200 ppm to help deepen foliage color. If a preplant fertilizer has been added to the soil, then just use the liquid fertilizer every two weeks.
Growing in the Summertime:
It is very important that the stem roots are developed before exposing the lilies to warm summer temperatures. Keep the planted bulbs for 3-4 weeks at or below 65°F to allow the roots to grow. This can be done in a bulb cooler or cool basement. Bulbs that have a poor root system will flower unevenly and have a lot of bloom dropping.
Marketing, Harvesting and Storage:
Forcers - as soon as the first flower has fully developed color, but is not open, the plants should be cut. Care must be taken not to damage the unopened buds during marketing. Whenever possible, lilies should not be stored.
More Details
Storage After Arrival
Before planting, rhizomes can be stored up to 4 weeks at 40-50⁰F. Be sure to keep them covered so they do not dry out.
Planting
Use a well drained, sterilized planting medium. Ideal pH should be 6.5 and no lower. Plant 3 rhizomes per 4" pot; 4 rhizomes per 5" pot.
Lay the corms (roots) flat and cover with 1/2" of soil medium. Fafard #2 and Metro Mix 350 are the best suited soils.
Avoid any soil which contains bark. Can be placed pot to pot when grown on benches until leaves start, then space 8" on center.
Watering
Water the medium thoroughly, then only water the medium when it becomes dry and/or the plants begin to grow vigorously. DO NOT OVERWATER.
Fertilizer
Because oxalis grow fast, they need to have sufficient fertilizer. Use a complete NPK fertilizer on a weekly basis once the plants begin to
grow vigorously. Either 200 ppm of 20-20-20 or 14-14-14 Osmocote can be used. If any chlorosis begins to appear in the oldest leaves,
use a micronutrient foliage spray. If the foliage is yellowing this could be a nitrogen deficiency problem.
Light Requirements
Use a medium light (2500-5000 ft. candle) intensity greenhouse that is well ventilated.
Temperature
In order to assure proper germination, start Regnelli White at 68-75⁰F - Triangularis & Fanny at 72-78⁰F. The plants grow well in full sun or light shade at temperatures between 70-75⁰F. If grown at lower than 65⁰F or higher than 85⁰F the plants may suffer. If flowers bloom down in the foliage, the plant has probably been grown with too much shade. Once the plants show vigorous growth the temperature may be lowered to 65⁰F.
Height Control for Pots
Height control - Bonzi drenches proved to be the most effective of all treatments for suppressing plant height in regnelli and triangularis. Sumagic drenches of 0.10 mg/pot were as effective as the Bonzi treatments in reducing the height of regnelli pink. The other concentrations of Sumagic did reduce the height in both varieties, but their effects were not as noticeable as were the Bonzi treatments. It was also determined that A'Rest should not be used on these species due to its cost and inactivity. Oxalis growers can use Bonzi drenches in the range of 0.05 to 0.1 mg/4 1/2" pot to "stop" further growth once a desired height is reached. Early drenching of Bonzi is to be avoided since this would probably cause severe stunting.
Insects
Oxalis are almost disease free, but will attract insects in warmer temperatures. The following product is advised for spiders - Pentac 50
wettable powder - 8 ounces per 100 gallons of water, 2 applications per week for two weeks.
Marketing
Plants are ready to market when foliage is fully expanded. It is not necessary to have flowers present.
More Details
Soil and Preparation
Peonies prefer well-draining, humus-rich moist soil. Amend heavy or very sandy soil with compost. Additionally, 1 cup of bonemeal can be used to amend the soil prior to planting. Choose a location in full sun, but one that provides ample growing room along with protection from strong winds.
Planting
Dig a a hole large enough to accommodate the roots and set the root so the eyes face upward. Fill in the hole, making sure to keep the peony's eyes/buds not deeper than 2" below the soil line. Water thoroughly to settle the soil around the roots.
Fertilization During Growing
They do not require fertilization other than a yearly addition of compost unless a soil test shows a deficiency in nutrients.
Cutting Guidelines
Years 1 & 2: Do not cut any blooms. Dis-budding is recommended to encourage root growth and overall plant development.
Year 3: For 2/3 eye roots - Cut 1/3 of the total blooms; For 3/5 eye roots - Cut 50% of the blooms
Year 4: Cut 70% of the total blooms
More Details

densely clustered flat flower buds start as pale pink, maturing to rosy red
More Details
Calla For 3 Gallon Pot (6" or 1 gallon pot instructions below)
Planting
Aethiopica are moisture loving. Use a well draining media with a pH of 5.5-6.5 that is high in organic matter. Plant 2" deep in containers or 3-4" deep in beds.
Light
Aethiopica will withstand a wide range of light conditions (500 to 5,000 candles). Higher light can be tolerated in cool and humid periods.
Plants can handle full sun to 70% shade without becoming too badly stressed, but 50% shade is ideal. Deeply shaded conditions will cause lengthened, but weakened stems
Temperature
Aethiopica tolerate a range of temperatures but prefers relatively cool temperatures. Optimum daytime temperatures are 55-65⁰F; nighttime 45-55⁰F; germination at 65-70⁰F until sprouting helps hasten rooting and establishment. Cool nights with clear days will promote shorter, stronger stems. Aethiopica are somewhat frost sensitive. Foliage will not withstand prolonged freezing temperatures. Bulbs can take some frost but not soil freeze to bulb depth.
Watering
Keep soil slightly moist until substantial sprouts emerge. Then keep soil slightly moist (but not soggy) until peak bloom then decrease moderately.
Fertilization
Proper fertility is critical for full plant growth with well-colored leaves and continued flower production in Aethiopica. Use a soil incorporated 30-day release preplant charge of nitrogen and potassium (containing little or no phosphorous). This will produce good early establishment of roots and improved early vigor. At approximately 3-4 weeks, begin a semi-balanced liquid feed @ 200 ppm weekly or 100 ppm constant using 20-10-20 or initially as needed. Modifications can then be made based on individual growth objectives and conditions. At leaf unfurling, reducing to 50 ppm alternated 1:1 with clear water will keep plants from getting too leafy. Alternately, consider the use of a low phosphorous fertilizer (i.e. 17-5-17) can result in better plant balance.
Height Control
Generally it is best to make a single PGR drench application when plants are at 1/2 to 3/4 desired plant height. Note that the require rate will depend primarily on the light, temperature, fertility and your bulb size & form. It’s often best to use apply Bonzi at 7.5-10 ppm @ 0.25-0.33oz/gal (2-2.6ml/L). 3.75-7.5 ppm @ 0.125-0.25oz/gal (1-2ml/L) should be used if: 1) lighter desired effects are desired; 2) earlier or multiple applications will be use; 3) smaller and/or clustered bulbs are being used. TOO HIGH A RATE OR TOO EARLY AN APPLICATION CAN CAUSE LEAF CRINKLING, PLANT ROSETTING, LACK OF BLOOM OR GENERAL STUNTING. If plants become over growth regulated, a GA rescue spray can be effective @100-200ppm GA3 or GA4+7 [and coupled with a mild surfactant]. *Bonzi rates higher than 10 ppm may arrest plant height completely.
Disease Prevention & Control
Aethiopica is generally susceptible to three (3) primary soil borne pathogens: Pythium & Phytophthora (“water molds”) plus Rhizoctonia and bacteria: Erwinia (Pectobacteria spp.). “Water molds” are often the first & most critical component in the disease complex, followed by Rhizoctonia. with the following preferred materials:
Once root injury occurs, Erwinia will often enter as a seconday infection. Our best tank mixed, four-part chemical drench targets the “3-pathogen complex”
1) WATER MOLD part 1- Subdue Maxx (mefenoxam 25.1% ai) @ 0.5-1oz/100 gal (4-8ml/100 L)
2) WATER MOLD part 2- Aliette (fosetyl-aluminum 80% ai) @ 13oz/100 gal (98gm/100 L)
3) RHIZOCTONIA- Heritage (azoxystrobin 50% ai) @ 4oz/100 gal (30gm/100 L)
4) ERWINIA- Agrimycin-17 (streptomycin sulfate 21.2% ai) @ 8-16oz/100 gal (60-120gm/100 L)
Pesticide drench timing is critical. Drench within the first 2-3 days of initial watering . Timing of the second drench should be made at 14 to 21 days. A third drench may be necessary 3-6 weeks after the second one (5-9 weeks from planting). *Always drench in the mornings or early enough for all foliage/runoff to dry thoroughly. Watch for leaf spot as leaves unfurl. Once leaf spot is observed, spray foliage to runoff with a selection of the following:
1) BACTERIAL LEAF SPOT part 1- Champ II (copper hydroxide 37.5%) @ 32-64oz/100 gal (240- 479ml/100 L
2) BACTERIAL LEAF SPOT part 2- Dithane (mancozeb 75%) @ 32oz/100 gal (24 ml/100 L)
3) FUNGAL LEAF SPOT option 1- Daconil Weather Stik (chlorothalonil @ 54%) @ 22oz/100 gal (165ml/100 L) option 2- Chipco 26019 26GT (iprodione @ 23.3%) @ 32oz/100 gal (240 ml/100 L) *DO NOT COMBINE FOLIAR COPPERS WITH ALIETTE OR OTHER ACIDIFYING PRODUCTS.
Inspect Crop Weekly. Routinely scout for cleared or browning roots, leaf spots, etc. • ALWAYS WATCH FOR ERWINIA INFECTED PLANTS TO CAREFULLYROGUE & DISCARD. Re-drench per recommendations if root problems are discovered, up to a total of three times over the life cycle. Sanitation is critical, especially in multiple cropping programs where rot can progress without an obvious cause. Sanitize benches, floors, conveyors, pots, soil mixers, etc. between crops.
Insects
Control Fungus Gnats and Shoreflies due to their ability to spread bacteria and other diseases. Control white flies, aphids and thrips on an as-needed basis.If aphid or thrips are present, use aggressive control measures since they are capable of rapidly spreading various viruses. Watch for early leaf chewing evidence from larvae after sprouting. Most materials can safely be applied at label rates; beware of chemical incompatibilities described on label(s).
Calla for 6" or 1 gallon pots
Storage After Arrival
Unpack on arrival. Dispose of any soft rot and wash hands to avoid spreading the bacterial to healthy bulbs. Place in well ventilated trays at 65° F for a couple of days prior to planting. This will insure any possible friction wounds caused by transit are well callused before planting. For long-term storage (6 weeks or more) keep well ventilated at 45° F and a relative humidity of 80%.
Potting Medium
Plant with 1 to 1 1/2" of medium over the tuber, rounded side down, sprouts (eyes) up. Pot sizes below 4 1/2" standard are more difficult to grow due to root volume restrictions (especially in clay pots). Suggested planting guide is one bulb per 4 1/2" pot and 2 bulbs per 6 1/4" pot. Additional care and management of fertility and irrigation are required in small or shallow pots because plants tend to be weaker, more easily stressed and, therefore more disease prone. The medium should be well drained, a pH of 6 - 6.5 and have good air porosity (optimal at 20% +/- 5%).
Watering
Water management is critical. Keep pots moist but avoid excessively wet and excessively dry conditions. The first (within 2 days of planting) thorough watering should be a three-part preventative chemical drench. Then water sparingly until leaves unfurl. In week 3 or 4 reinoculate with a drench of Trichoderma and then a week later do a second chemical drench. Schedule these drenches to coincide with required watering to avoid overly wet pots.
Light
Calla can be exposed to full sunlight, unless the temperature in the greenhouse goes over 80° F, then some shading is recommended to avoid leafburn.
Fertilizer
Early fertility levels in calla, at the time of planting and extending two weeks, enhances overall long-term plant fullness and uniformity of vigor. A 10-20 day media incorporated pre-charge of nitrogen and potassium (no phosphorous in early pots) would be ideal.
Marketing
Market your pots with slightly less than one half the total number of expected blooms showing color or in spike. Ship long distances under refrigerated conditions (approximately 40° F or 5° C) to avoid excessive stretching. Retail under cool and bright conditions.
More Details")
Where to Plant:
Choose a location that receives light to moderate shade. Avoid full sun.
How to Plant:
Astilbe prefer rich, well draining soil. Amend heavy soils with peat moss, perlite, compost, or course sand to improve drainage. Plant astilbe so that the crown is at the same level as the top of the soil. Make sure the holes are twice as wide as the plants and 4 to 6 inches deep. Place the plants so that the roots are fanned slightly and pointing downwards, with the crown planted 1 to 2 inches below the ground level. Cover the roots with soil and press firmly.
Water:
Keep soil consistantly moist, but avoid over watering. Do not allow to dry out between waterings.
More Details
Canna can be planted anytime of the year in southern zones but the soil temperature should be 78-80° F. In zones 3-8, plant in spring and summer when ground temperature is not below 65°F. They should be started indoors one month prior to moving outside. Canna prefer a sunny location in moist, fertile soil. When planting outside, prepare soil by spading and adding compost or rotted manure. Rhizomes should be planted 1 - 1/2" deep and spaced 18-24" apart. Soak well after planting. For container planting, pot one rhizome per gallon in well drained potting mix. Containers will finish in 10-12 weeks when potted during the appropriate temperatures: Daytime 70-75° F; Night 65-70° F. Fertilize established (2-3 weeks) plants monthly with 1:2:1 ratio (12:24:12 or 5:10:5), fertilizing at 1/2 the package recommendation. NPK at 200 ppm weekly in injector fed systems.
More Details
Location
Clematis and vines will require an area that will have at least a half day or more direct sunlight. The plant depending on the variety will grow upright six to twelve feet. Although it can only grow as tall as the trellis, arbor or support that you have given it. For example, if your trellis is eight feet tall and the vine you choose grows to twelve feet, it would simply hang over and grow down the other side.
Soil Preparation
Clematis and vines need a moist, well-drained soil. Prepare your hole at least one foot deep and mix 50% peat moss or well-rotted manure. Backfill hole with the amended soil and plant the vines so the top of the root ball is just below the ground level burying the first set of eyes. The plant should be mulched and kept moist, not wet, especially during the first growing season. Fertilize every four weeks during the growing season with a
well-balanced liquid fertilizer.
Support
The main stem of the clematis or vines must have a firm support, otherwise damage may occur through wind. As the newly planted
vine produces new growth this should be carefully trained and tied into position.
More Details
Where To Plant
Bleeding heart will grow best in partial to full shade. Ideally, bleeding heart should have morning sun and afternoon shade for best flowering.
How To Plant
Bleeding heart prefer a well draining, slightly acidic soil (pH 6.0 to 6.5), but will tolerate a pH up to 7.5. Apply compost or a general purpose, granular fertilizer in spring. Plant bareroot bleeding heart with the crown 1-2" below the soil line. If grown in poorly drained, wet soil, the crowns of the plants may rot. Avoid these soils and allow good air circulation.
More Details

How To Plant
Geraniums prefer full sun and a well-drained, moderately rich soil. They can handle partial shade, but become more prone to mildew if kept damp. Geraniums are not particular about soil pH, but a neutral to slightly acid soil is ideal. (5.8 - 7.0)
Mid Season Care
Shearing plants back to basal growth after blooming will improve their look and encourage reblooming. The plants fill back in within weeks.
More Details
Soil and Preparation:
Gladioli are one of the easiest flowers to grow. They do well in a wide range of soil types – provided drainage is good, but they grow best in soil with a pH of 6.5 to 7. Most garden soil that will produce a good crop of vegetables or weeds will also grow good glads with little or no added fertilizer. Glads prefer full sunlight, but will do reasonably well with a little high shade in early morning or late afternoon. Good circulation is desirable, so stay away from buildings or other obstructions, which might impede airflow. Plow, rototill, or spade your soil as you would for any other garden plants. It is best to move your glad plantings from one area to another each year to help prevent carryover of diseases in the soil. If soil tests or other reliable indicators point to a lack of nutrients, a balanced commercial fertilizer such as 5-10-10 may be incorporated into the soil immediately prior to planting, at a rate of 2- 3 pounds per 100 square feet. Avoid over-fertilizing. Composted animal manure or leaves should only be worked into the soil in the fall.
Planting:
Your first planting should be when you would normally plant sweet corn in your area. Corms (commonly called bulbs) planted in cold soils are apt to rot before they begin to grow. Subsequent plantings at two-week intervals will ensure bloom over a long period of time. We recommend planting corms three to five inches deep and from four to six inches apart, in rows spaced 12-36 inches apart. Insecticide spread in the trench before covering will discourage underground insects. Before glads bloom, hilling soil six inches up around the stalk helps prevent the glads from tipping over during storms. If drainage is a problem in your soil, rows should be raised to facilitate the process. Soggy, compacted soil will hamper root growth and contribute to root rot.
Watering:
Remember that glads need plenty of water, but will not tolerate wet feet. Lack of water inhibits spike growth, flower development and bulb growth. At least an inch of water per week is a good guideline.
Fertilization During Growing:
Before starting any fertilization program, always test the soil for nutrient content. The application of fertilizer should coincide with crop needs. We recommend starting fertilization when the third or fourth leaf is visible. Amounts will vary according to the soil test, but for poor, light soil you may use a fertilizer of 5-10-10 again, or just nitrogen if the nutrient content of your soil is balanced. You would apply this as a side dressing.
Weed and Insect Control:
Weed by shallow cultivation and hand weeding. If available, a light mulch of straw, grass clippings, etc. between rows will discourage weeds and help conserve moisture. Insect control is important in growing glads. Pests include thrip, which is by far the most damaging. Thrip are tiny insects, tan to black in color and less than 1/8” in length. They can be controlled by several good combination sprays and dusts, including organic products, and are available at your local garden centers. If you chose organic products, more frequent applications will be needed.
Digging Corms (Bulbs):
If you live where the ground does not freeze in the winter, you may choose not to dig your corms; however, disease and crowding may reduce the amount and quality of your bloom. You should remove plant tops 6-8 weeks after bloom and remove them from the garden to prevent the spread of disease. It is suggested that you dig and divide your corms every couple of years, being sure to discard any damaged or diseased corms. If you live where the ground freezes, you will need to dig your corms each year, or if you choose not to dig, purchase new corms in the spring. Corms should be lifted in the fall before the onset of freezing weather. About 6-8 weeks after blooming, the corms may be harvested by loosening the soil with a spade or digging fork so that the plants can be pulled up by hand. The plant should be separated from the corm as close to the corm as possible, either by hand breaking or by cutting with pruning shears. You should remove the old plant tops from the field to prevent carryover of disease. The corms should be cleaned or rinsed off with running water, and then spread out to dry in shallow layers in trays or porous bags in an airy location that will not freeze for a period of 2 to 3 weeks. During this time a cork layer forms between the new corm and the old mother corm and roots. Break off and discard this old corm as soon as possible. Undue delay in cleaning results in greater difficulty in removal of the old corm.
Corm Storage:
After cleaning, corms should be lightly dusted with a combination fungicide/insecticide dust, placed in shallow trays, mesh bags or open paper bags to be stored for the winter. Do not use any covering material. A well-ventilated root cellar is ideal, but any room with good air circulation in the average home basement will suffice if temperatures can be kept between 35-50 degrees. The lower temperature is best, as long as they do not freeze.
More Details
Soil and Preparation:
Daylilies flower best when planted in full sun (6 hours/day), with moist, yet well-drained soil. Daylilies will grow in a wide range of soils, from sand to heavy clay, and in a wide range of soil pHs. Clay soils can be improved by the addition of compost, humus or peat moss, or sand which will help make it more friable. Sandy soil will benefit from the addition of compost, humus or peat moss which will serve to increase water retention. Amend the soil withcompost before planting. Space plants 12 to 18 inches apart and plant so the crown is about 1 inch below the soil surface. Water well and mulch with bark or straw to conserve moisture and prevent weeds from growing.
Planting:
Dig a hole large enough to accommodate the root mass, usually about 6-8" deep. Once the hole is prepared, place the daylily upright, without cramming it into the space. Holding it so the crown (top of the roots) is about one inch below the surface of the ground, spread the roots out in the hole and loosely push soil over the roots until the hole is nearly full. Press the soil down around the roots, without covering any green of the plant. Leave a slight depression, or water reservoir, around the plant, about 1/2" deep.
Watering:
Watering is most important in spring when the plants are making scapes and buds, and in the summer during the bloom season. Daylilies benefit more from deep watering, which reaches 8 to 10 inches into the soil, than from a succession of brief, surface waterings.
Fertilization During Growing:
They do not require fertilization other than a yearly addition of compost.
More Details
Planting
Bearded iris grow best in well-drained soil. Sloped or raised beds help ensure good drainage. Coarse sand or humus may be added to improve drainage. The ideal soil pH is 6.8 (slightly acidic). Iris do best with at least 6 hours a day of full sun. Insufficient sunlight will result in iris producing foliage, but no blooms.
When to Plant
For best results, iris should be planted at least six weeks before the first hard frost in your area. Establishing a good root system before the growing season ends is imperative.
Planting
Plant iris so the tops of the rhizomes are exposed and the roots are spread out facing downward into the soil. In very light soil or extremely hot climates, covering the rhizome with a light covering of soil by be used to shade the rhizome and prevent scorching. A common mistake is to plant bearded iris too deep. Ideally, the tops of the rhizomes should be visible above the soil level. Bearded iris planted 12 to 24 inches apart will require less frequent thinning. Watering in newly planted rhizomes will help settle the soil and encourage root growth.
Watering
Moisture helps establish root systems of newly planted rhizomes. Deep watering at long intervals is preferred to frequent shallow waterings. Unless the growing area is very dry, iris don’t need to be regularly watered. Over-watering is a common error.
Fertilizer
Use only a low-nitrogen fertilizer (6-10-10), bone meal or superphospate. A light application in the spring when springs bulbs such as tulips are blooming and a second light application about a month later is all the is required. Avoid the use of anything high in nitrogen. Over feeding iris with anything high in nitrogen will prevent the plant from producing blooms.
Growing Iris in Containers
Use a roomy pot with good drainage. Bearded iris need a one gallon pot or larger. Fill to one inch below the rim of the container with well-draining soil that is low in nitrogen. Plant rhizomes so that the tops of the rhizomes are exposed. Water only when the top two inches of soil are dry. Over-watering will encourage rot. Containers can be over-wintered outdoors, but protect pots from freezing by moving into an unheated garage or other unheated, protected location when sustained daytime temperatures are below 32F or nighttime temperatures are below 25F. In climates with harsh winter weather, sink the pot into the soil and cover with mulch. Divide and transplant iris every few years or as they begin overcrowding the pot.
More Details
On Arrival
After being programmed, forcers should be prepared to plant bulbs when they arrive. If they must be stored, place at 32-35° F. Forcers should always check to be certain the bulbs are not seriously damaged or diseased. Do not store for longer than 10 days. DO NOT REFREEZE!!
Planting
In all cases, the planting media should be sterile, well drained, have a pH of 6.5 to 7.5 with pH of 7.0 being preferred. Because some lilies can develop leaf scorch due to soil borne fluoride, the medium should not contain superphosphate or perlite. Dip for 30 minutes with one of the three following recommended formulas:
For potted plants, use standard pots and plant bulbs so there is 2 inches of planting medium above the bulb nose. This is necessary to develop stem roots.
Suggested Number of Bulbs Per Pot
12/14 cm. 3 per 6 inch (15 cm) pot
14/16 cm. 1-2 per 6 inch (15 cm) pot
16/18 cm. 1 per 6 inch (15 cm) pot
Light
Lilies require a medium to high Light (>2500 ft candle) intensity greenhouse, especially during the short days of winter. If shading was used during the summer, be certain to clean the glass thoroughly before winter. In most instances lilies respond to HID lighting during the winter months. This aids in reducing flower abortion and abscission especially with sensitive cultivars. Forcers who have lowlight intensity winters should seriously consider installing an HID lighting system for forcing cut lilies. Use light 4-8 hours per day. When very high light conditions occur (spring/summer), screening or shading is advised.
Watering
Water the planting medium thoroughly after planting and then keep the medium moist, but not wet.
Growing in the Summertime
It is very important that the stem roots are developed before exposing the lilies to warm summer temperatures. Keep the planted bulbs for 3-4 weeks at or below 65°F to allow the roots to grow. This can be done in a bulb cooler or cool basement. Bulbs that have a poor root system will flower unevenly and have a lot of bloom dropping.
Temperature
Use 55-63°F night temperatures and not higher than 70°F day temperatures. Avoid great fluctuations in temperature, because this can help to promote leaf scorch. Whenever possible, start Orientals at 59°F for about 4 weeks. Later, Orientals can be forced at higher temperatures (63-65°F) than Asiatics. In general, Asiatic and longiflorum lilies take 30-35 days to flower after they reach the visible bud stage of development and Orientals take 50-55 days. When seasonally warm temperatures occur, try to keep the soil and air temperatures below 68° F. Use shading when necessary.
Ventilation
Use a well ventilated greenhouse. Do not permit humidity to build up.
Fertilizer
The bulbs themselves contain lots of stored food, and they should be able to support the plant until the shoot emerges. Recommendations suggest withholding fertilizer until the shoot is 4-6" tall. Some growers incorporate a 10-6-4 slow release fertilizer in the medium prior to planting. Suggested rate is eight pounds per cubic yard. Use a liquid fertilizer such as 16-4-12 at the rate of 200 ppm to help deepen foliage color. If a preplant fertilizer has been added to the soil, then just use the liquid fertilizer every two weeks. A well fertilized lily tends to be shorter than an under fertilized plant.
Plant Growth Retardants
Height control is one of the more difficult aspects of pot lily forcing. Forcers need to rely greatly on their past experiences with the various cultivars and then decide whether or not to use ancymidol (A'Rest), Bonzi, Sumagic, or any other approved growth retardant. If soil drenches are to be used, split applications are usually best. Also, the pH of the medium needs to be about 7.0 to get the most effective response of the soil drenches, particularly for A'Rest. The first to be applied at shoot emergence, the second 10-14 days later. Foliar sprays can also be used. In addition there has been research conducted on preplant bulb dips. If EPA approved, forcers should experiment with the procedure to determine the best rate and length of the bulb dip to use for their forcing conditions and cultivars used.
Marketing and Storage
Forcers - plants should be marketed as soon as first flower begins to color. This insures that the consumer will receive maximum enjoyment. Care must be taken not to damage the unopened buds during marketing. Storage should be kept to a minimum. If they must be stored, place them at 35-40°F when the first flower is fully colored, but not open.
According to Cornell University trials a 50 ppm application of facination 2 days before storage will prevent leaves from yellowing.
More Details
Asiatic and Oriental hybrid lily bulbs used for cut flower forcing can be forced on a year-round basis by using a combination of precooled and frozen-in bulbs. The number of cultivars available is constantly changing. Generally, the asiatics force in 8-10 weeks. Oriental and auratum lilies force in 12-15 weeks and are available until June 30th.
On Arrival
After being programmed, forcers should be prepared to plant bulbs immediately on arrival. If they must be stored, place them at 32-35 ° F. Storage at higher temperatures will cause desiccation of the bulbs which will result in fewer flowers per stem. Forcers should always check to be certain the bulbs are not seriously damaged or diseased. Do not store for longer than 10 days. DO NOT REFREEZE.
Planting and Spacing
The planting medium should be sterile, well drained and have a pH of 5.5 to 7.5 with pH 7.0 being preferred. Because some lilies can develop leaf scorch due to soil borne fluoride, the medium should not contain superphosphate or perlite. If ground beds or raised benches are used, be certain to sterilize them and be sure they are low in soluble salts. Leaching may be necessary. They must be well drained. Bulbs for cut flowers can be planted in ground beds, 8-10" deep raised beds or standard pots. Plant bulbs with at least 2" of planting medium above the bulb nose. This is necessary to develop stem roots.
Suggested Number of bulbs for Cut Flower Forcing in Beds or Raised Benches:
Asiatic Hybrids
12/14 cm 6-9 per sq ft
14/16 cm 5-8 per sq ft
Oriental Hybrids
16/18 cm 4-6 per sq ft
18/20 cm 4-5 per sq ft
Support System:
Because of their length and variation in stem strength, some cut lily cultivars may need wire support systems. If used, be certain the netting has holes large enough to accommodate easy cutting and removal of the flowers. Also, place the netting over the bulbs directly after planting.
Watering:
Water the planting medium thoroughly after planting and then keep the medium moist but not wet.
Light:
Lilies require a medium to high Light (>2500 ft candle) intensity greenhouse, especially during the short days of winter. If shading was used during the summer, be certain to clean the glass thoroughly before winter. In most instances lilies respond to HID lighting during the winter months. This aids in reducing flower abortion and abscission especially with sensitive cultivars. Forcers who have low light intensity winters should seriously consider installing an HID lighting system for forcing cut lilies. When very high light condition occur (spring/summer), screening or shading is advised. Extremely high light intensities can reduce the length of the cut flower.
Use 55-63° F (13-17° C) night temperatures and not higher than 70° F (21° C) day temperatures. Avoid great fluctuations in temperature, because this can help to promote leaf scorch. Also, whenever possible, start Orientals at 59° F (15° C) for about 4 weeks. Later, Orientals can be forced at higher temperatures (63-65° F/17-18° C) than Asiatics. In general, Asiatic and longiflorum lilies take 30-35 days to flower after they reach the visible bud stage of development and Orientals take 50-55 days. Lastly, when seasonally warm temperatures occur, try to keep the soil and air temperatures below 68° F (20° C). Mulching of ground or raised bed and shading are advised. Ground or raised bed and shading are advised. Use a well ventilated greenhouse. Do not permit humidity to build up.
The bulbs themselves contain lots of stored food, and they should be able to support the plant until the shoot emerges. Recommendations suggest withholding fertilizer until the shoot is 4-6" tall. Some growers incorporate a 10-6-4 slow release fertilizer in the medium prior to planting. Suggested rate is eight pounds per cubic yard. Use a liquid fertilizer such as 16-4-12 at the rate of 200 ppm to help deepen foliage color. If a preplant fertilizer has been added to the soil, then just use the liquid fertilizer every two weeks.
Growing in the Summertime:
It is very important that the stem roots are developed before exposing the lilies to warm summer temperatures. Keep the planted bulbs for 3-4 weeks at or below 65°F to allow the roots to grow. This can be done in a bulb cooler or cool basement. Bulbs that have a poor root system will flower unevenly and have a lot of bloom dropping.
Marketing, Harvesting and Storage:
Forcers - as soon as the first flower has fully developed color, but is not open, the plants should be cut. Care must be taken not to damage the unopened buds during marketing. Whenever possible, lilies should not be stored.
More Details
On Arrival
After being programmed, forcers should be prepared to plant bulbs when they arrive. If they must be stored, place at 32-35° F. Forcers should always check to be certain the bulbs are not seriously damaged or diseased. Do not store for longer than 10 days. DO NOT REFREEZE!!
Planting
In all cases, the planting media should be sterile, well drained, have a pH of 6.5 to 7.5 with pH of 7.0 being preferred. Because some lilies can develop leaf scorch due to soil borne fluoride, the medium should not contain superphosphate or perlite. Dip for 30 minutes with one of the three following recommended formulas:
For potted plants, use standard pots and plant bulbs so there is 2 inches of planting medium above the bulb nose. This is necessary to develop stem roots.
Suggested Number of Bulbs Per Pot
12/14 cm. 3 per 6 inch (15 cm) pot
14/16 cm. 1-2 per 6 inch (15 cm) pot
16/18 cm. 1 per 6 inch (15 cm) pot
Light
Lilies require a medium to high Light (>2500 ft candle) intensity greenhouse, especially during the short days of winter. If shading was used during the summer, be certain to clean the glass thoroughly before winter. In most instances lilies respond to HID lighting during the winter months. This aids in reducing flower abortion and abscission especially with sensitive cultivars. Forcers who have lowlight intensity winters should seriously consider installing an HID lighting system for forcing cut lilies. Use light 4-8 hours per day. When very high light conditions occur (spring/summer), screening or shading is advised.
Watering
Water the planting medium thoroughly after planting and then keep the medium moist, but not wet.
Growing in the Summertime
It is very important that the stem roots are developed before exposing the lilies to warm summer temperatures. Keep the planted bulbs for 3-4 weeks at or below 65°F to allow the roots to grow. This can be done in a bulb cooler or cool basement. Bulbs that have a poor root system will flower unevenly and have a lot of bloom dropping.
Temperature
Use 55-63°F night temperatures and not higher than 70°F day temperatures. Avoid great fluctuations in temperature, because this can help to promote leaf scorch. Whenever possible, start Orientals at 59°F for about 4 weeks. Later, Orientals can be forced at higher temperatures (63-65°F) than Asiatics. In general, Asiatic and longiflorum lilies take 30-35 days to flower after they reach the visible bud stage of development and Orientals take 50-55 days. When seasonally warm temperatures occur, try to keep the soil and air temperatures below 68° F. Use shading when necessary.
Ventilation
Use a well ventilated greenhouse. Do not permit humidity to build up.
Fertilizer
The bulbs themselves contain lots of stored food, and they should be able to support the plant until the shoot emerges. Recommendations suggest withholding fertilizer until the shoot is 4-6" tall. Some growers incorporate a 10-6-4 slow release fertilizer in the medium prior to planting. Suggested rate is eight pounds per cubic yard. Use a liquid fertilizer such as 16-4-12 at the rate of 200 ppm to help deepen foliage color. If a preplant fertilizer has been added to the soil, then just use the liquid fertilizer every two weeks. A well fertilized lily tends to be shorter than an under fertilized plant.
Plant Growth Retardants
Height control is one of the more difficult aspects of pot lily forcing. Forcers need to rely greatly on their past experiences with the various cultivars and then decide whether or not to use ancymidol (A'Rest), Bonzi, Sumagic, or any other approved growth retardant. If soil drenches are to be used, split applications are usually best. Also, the pH of the medium needs to be about 7.0 to get the most effective response of the soil drenches, particularly for A'Rest. The first to be applied at shoot emergence, the second 10-14 days later. Foliar sprays can also be used. In addition there has been research conducted on preplant bulb dips. If EPA approved, forcers should experiment with the procedure to determine the best rate and length of the bulb dip to use for their forcing conditions and cultivars used.
Marketing and Storage
Forcers - plants should be marketed as soon as first flower begins to color. This insures that the consumer will receive maximum enjoyment. Care must be taken not to damage the unopened buds during marketing. Storage should be kept to a minimum. If they must be stored, place them at 35-40°F when the first flower is fully colored, but not open.
According to Cornell University trials a 50 ppm application of facination 2 days before storage will prevent leaves from yellowing.
More Details
Soil and Preparation
Peonies prefer well-draining, humus-rich moist soil. Amend heavy or very sandy soil with compost. Additionally, 1 cup of bonemeal can be used to amend the soil prior to planting. Choose a location in full sun, but one that provides ample growing room along with protection from strong winds.
Planting
Dig a a hole large enough to accommodate the roots and set the root so the eyes face upward. Fill in the hole, making sure to keep the peony's eyes/buds not deeper than 2" below the soil line. Water thoroughly to settle the soil around the roots.
Fertilization During Growing
They do not require fertilization other than a yearly addition of compost unless a soil test shows a deficiency in nutrients.
Cutting Guidelines
Years 1 & 2: Do not cut any blooms. Dis-budding is recommended to encourage root growth and overall plant development.
Year 3: For 2/3 eye roots - Cut 1/3 of the total blooms; For 3/5 eye roots - Cut 50% of the blooms
Year 4: Cut 70% of the total blooms
More Details
Planting:
Plant bareroot phlox in the spring in loose soil deep enough that the crown is at the soil line. Adding compost and/or a granular fertilizer at this time is also beneficial. Once roots are covered in soil, water well.
Soil:
Prefers average to moist but well-drained soil (to prevent root rot). Also needs plenty of air circulation to prevent powdery mildew. Benefits from being cut to the ground before winter to prevent any powdery mildew infection carrying over to the next year.
Sun:
Prefers full sun to part shade.
More Details


