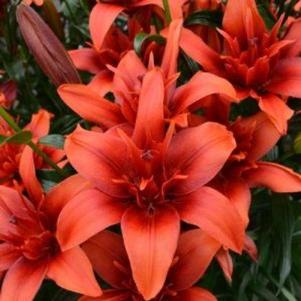
Lilies Double Asiatic 'Red Twin'
Outdoor Lilies

How To Plant
Soaking plants overnight or at least several hours prior to planting will do wonders for their growth. In the first year, keep them watered as needed. Do not plant too deep. The buds of the fern need to be just below the surface.
Where To Plant
Filtered shade is often the best, but many varieties can handle full sun.
Fertilizer
Do not use fertilizer on native plants. Fertilized ferns and wildflowers will look burnt and dried out but in fact it is a result of fertilization.
More Details
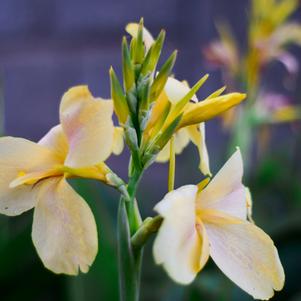
Deciduous and evergreen tuberous-rooted plants with strap-shaped leaves. Clusters of blue funnel-shaped flowers.
More Details
Storage After Arrival
Unpacked immediately upon arrival, ventilate if not immediately planted. Ideal storage temperatures are 50-55 degrees Fahrenheit.
Planting Preparation
Soak corms in room-temperature water for 4-6 hours prior to planting. Leave the water running at a trickle to increase oxygenation during soaking. Allow plenty of room for bulb expansion.
Planting in Zones 7 and warmer (Fall Planting)
Choose a location that receives general crop rotation and has well-draining soil and that does not still puddle 5 or 6 hours after a hard rain. Adding organic matter of at least 2-3in will improve drainage. For fall planted anemones, it is recommended to remove plants from soil after harvest and plant a new/different crop in the same space for summer harvest. Plant bulbs 3-4in apart, 2-3in deep. Water after planting to encourage root development. Cover rows with frost cloth if temperatures drop below freezing.
Planting in Zones 6 and colder (Spring Planting)
Growing in Containers:
Fill a container with drainage holes with good-quality, well-draining potting mix. Leaving 3-4 inches between bulbs will allow plenty of room for growth. Plant about 2 inches deep. Water after planting to settle the soil around the corms and close any gaps. Once the danger of a hard frost has passed, place the container in a location that receives full to part sun all day.
Growing in Outdoor Landscape Beds:
About a month before last average frost, soak the bulbs 3-4 hours (but not more than 4 hours) in tepid water before planting outside in a well-drained location with full sun. Choose a location that receives general crop rotation and has well-draining soil that does not still puddle 5 or 6 hours after a hard rain. It is not recommended to use the same bed to grow anemones year after year without growing a new/different crop in the same location in between growing anemones.
Growing in Greenhouses:
Follow instructions for container growing. Ideal greenhouse temperatures are 45-48 degrees Fahrenheit at night and 58-65 degrees Fahrenheit during the day. Temperatures above 70 degrees Fahrenheit should be avoided as higher temperatures will affect growth and flower production.
Watering/Fertilizer/Growing
Begin watering once plants begin to grow being careful not to allow the soil to become soggy. Fertilizer is not recommended during the first month in order to protect the young roots. After the first month, fertilize once or twice during the growing season using a general 7-3-7 NPK fertilizer. In warmer climates, wait until foliage dies back before completely removing it from the soil. In colder climates, anemone are annuals and bulbs will need to be replaced each year.
Shading:
Using a 20-30% shade net is recommended. The netting helps to keep the soil cool, thus keeping the plants in flower production longer. The use of shading also will encourage the stems to elongate.
More Details

How To Plant
Dig hole 1/3 larger than root system or bulb and make the hole 2-3 " deep. Add a thin layer of base soil back in the bottom of the hole.
Root systems (rhizomes) like Trillium and Virginia Blue Bells should be placed on their side, but bulbs and corms should be placed
upright in the hole so that the pointed end is upwards. Fill with soil and water thoroughly.
Watering
Water every three to four days for the first week if it does not rain.

Feathery, silky, silver-gray foliage w/small yellow flowers
More Details


Asparagus requires large space, with lots of sun and well drained soil. Male asparagus plants produce higher yields, spears might be smaller but are typically uniform and more numerous. Best time to plant is mid-April into late May.
More Details
Asparagus requires large space, with lots of sun and well drained soil. Male asparagus plants produce higher yields, spears might be smaller but are typically uniform and more numerous. Best time to plant is mid-April into late May.
More Details
Asparagus requires large space, with lots of sun and well drained soil. Male asparagus plants produce higher yields, spears might be smaller but are typically uniform and more numerous. Best time to plant is mid-April into late May.
More Details")
Where to Plant:
Choose a location that receives light to moderate shade. Avoid full sun.
How to Plant:
Astilbe prefer rich, well draining soil. Amend heavy soils with peat moss, perlite, compost, or course sand to improve drainage. Plant astilbe so that the crown is at the same level as the top of the soil. Make sure the holes are twice as wide as the plants and 4 to 6 inches deep. Place the plants so that the roots are fanned slightly and pointing downwards, with the crown planted 1 to 2 inches below the ground level. Cover the roots with soil and press firmly.
Water:
Keep soil consistantly moist, but avoid over watering. Do not allow to dry out between waterings.
More Details
Where to Plant:
Choose a location that receives light to moderate shade. Avoid full sun.
How to Plant:
Astilbe prefer rich, well draining soil. Amend heavy soils with peat moss, perlite, compost, or course sand to improve drainage. Plant astilbe so that the crown is at the same level as the top of the soil. Make sure the holes are twice as wide as the plants and 4 to 6 inches deep. Place the plants so that the roots are fanned slightly and pointing downwards, with the crown planted 1 to 2 inches below the ground level. Cover the roots with soil and press firmly.
Water:
Keep soil consistantly moist, but avoid over watering. Do not allow to dry out between waterings.
More Details")
Where to Plant:
Choose a location that receives light to moderate shade. Avoid full sun.
How to Plant:
Astilbe prefer rich, well draining soil. Amend heavy soils with peat moss, perlite, compost, or course sand to improve drainage. Plant astilbe so that the crown is at the same level as the top of the soil. Make sure the holes are twice as wide as the plants and 4 to 6 inches deep. Place the plants so that the roots are fanned slightly and pointing downwards, with the crown planted 1 to 2 inches below the ground level. Cover the roots with soil and press firmly.
Water:
Keep soil consistantly moist, but avoid over watering. Do not allow to dry out between waterings.
More Details


How To Plant
Soaking plants overnight or at least several hours prior to planting will do wonders for their growth. In the first year, keep them watered as needed. Do not plant too deep. The buds of the fern need to be just below the surface.
Where To Plant
Filtered shade is often the best, but many varieties can handle full sun.
Fertilizer
Do not use fertilizer on native plants. Fertilized ferns and wildflowers will look burnt and dried out but in fact it is a result of fertilization.
More Details

Caladiums require a warm, moist soil. A minimum of soil temperature of 78-80 F is preferred. If planted too early in spring, cool soil temperatures will cause tubers to rot before they sprout. They can be started indoors in moist peat moss or potting soil in containers such as a shallow flat or flower pot. Barely cover tubers with soil and place the container in a warm germination room with bright light. Tubers should be started indoors approximately four weeks before planting outdoors.
More Details
Caladiums require a warm, moist soil. A minimum of soil temperature of 78-80 F is preferred. If planted too early in spring, cool soil temperatures will cause tubers to rot before they sprout. They can be started indoors in moist peat moss or potting soil in containers such as a shallow flat or flower pot. Barely cover tubers with soil and place the container in a warm germination room with bright light. Tubers should be started indoors approximately four weeks before planting outdoors.
More Details")
Caladiums require a warm, moist soil. A minimum of soil temperature of 78-80 F is preferred. If planted too early in spring, cool soil temperatures will cause tubers to rot before they sprout. They can be started indoors in moist peat moss or potting soil in containers such as a shallow flat or flower pot. Barely cover tubers with soil and place the container in a warm germination room with bright light. Tubers should be started indoors approximately four weeks before planting outdoors.
More Details
Caladiums require a warm, moist soil. A minimum of soil temperature of 78-800 F is preferred. If planted too early in spring, cool soil temperatures will cause tubers to rot before they sprout. They can be started indoors in moist peat moss or potting soil in containers such as a shallow flat or flower pot. Barely cover tubers with soil and place the container in a warm germination room with bright light. Tubers should be started indoors approximately four weeks before planting outdoors.
More Details
Caladiums require a warm, moist soil. A minimum of soil temperature of 78-80 F is preferred. If planted too early in spring, cool soil temperatures will cause tubers to rot before they sprout. They can be started indoors in moist peat moss or potting soil in containers such as a shallow flat or flower pot. Barely cover tubers with soil and place the container in a warm germination room with bright light. Tubers should be started indoors approximately four weeks before planting outdoors.
More Details